
Native ads integration for React Native
Native ads are a form of advertising that you can customize to blend in with the other content in your app. This makes ads appear more organic, which leads to a better user experience and higher retention.
Make sure you have correctly integrated the ironSource React Native Plugin 8.4.0+ into your application. The integration is outlined here.
There are two ways to integrate LevelPlay native ads using the React Native plugin:
- Native Templates: Predefined templates(XML and XIB files) provided by plugin.
- Custom Templates: Custom templates styled and designed by developers.
Native Templates
Native templates are predefined views that implement the native ad logic. Utilizing this setup is recommended for fast and easy implementation. It handles the population of views once the ad has loaded and clears them once the ad is destroyed.
There are two template options:
- Small: Templates that do not include the media view.
- Medium: Templates that feature the media view.
While the styling is generally similar, you can also customize it according to your preference.
| Android | iOS | |
| Small | 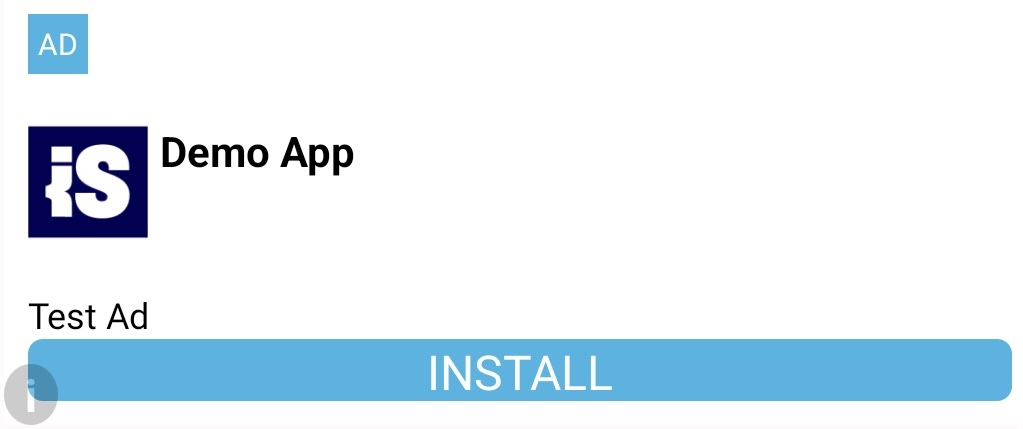 |
 |
| Medium |  |
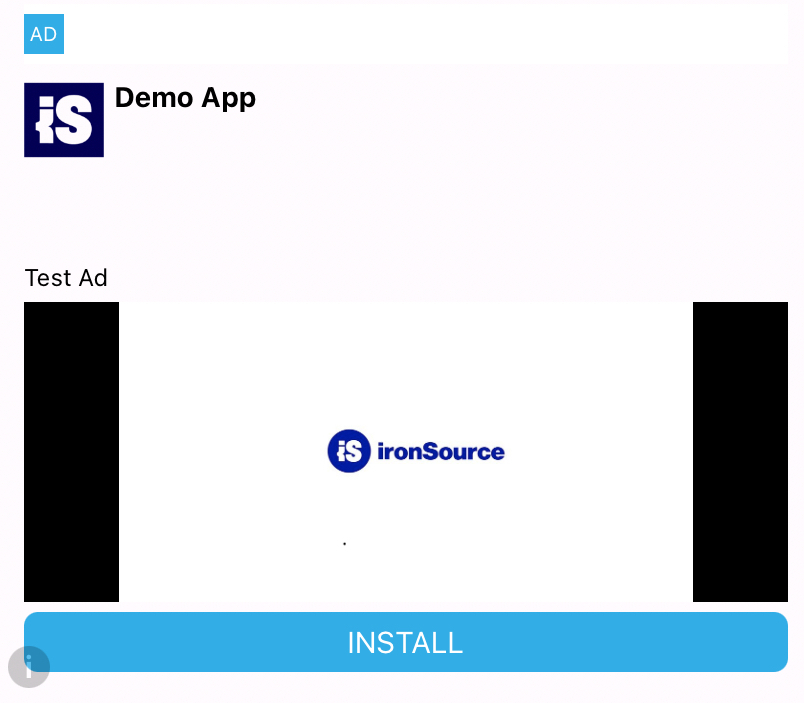 |
To integrate native templates, follow the steps below:
Step 1. Create LevelPlayNativeAd Object
Create a LevelPlayNativeAd object responsible for loading the ad into the LevelPlayNativeAdView container. This object will handle the ad methods such as load, destroy and will define the ad placement and listener for event callbacks.
nativeAd = LevelPlayNativeAd.builder()
        .withPlacement([YOUR_PLACEMENT])
        .withListener([YOUR_LEVEL_PLAY_NATIVE_AD_LISTENER])
        .build();
Step 2. Implement the Listener
Next, implement the LevelPlayNativeAdListener in your code. The LevelPlay SDK fires several callbacks to inform you of native ad activity. The SDK will notify your Listener of all the events listed below:
/**
 Called after a native ad has been clicked.
 @param nativeAd Level Play native ad.
 @param adInfo The info of the ad.
 */
onAdClicked(nativeAd: LevelPlayNativeAd, adInfo: IronSourceAdInfo) {}
/**
 Called after a native ad impression has been recorded.
 @param nativeAd Level Play native ad.
 @param adInfo The info of the ad.
 */
 onAdImpression(nativeAd: LevelPlayNativeAd, adInfo: IronSourceAdInfo) {}
/**
 Called after a native has attempted to load an ad but failed.
 @param nativeAd Level Play native ad.
 @param error The reason for the error
 */
onAdLoadFailed(nativeAd: LevelPlayNativeAd, error: IronSourceError) {}
/**
 Called after a native ad has been successfully loaded
 @param nativeAd Level Play native ad.
 @param adInfo The info of the ad.
 */
onAdLoaded(nativeAd: LevelPlayNativeAd, adInfo: IronSourceAdInfo) {}
Step 3. Create LevelPlayNativeAdView
Create a LevelPlayNativeAdView component to define the container that will host the loaded native ad. This object will define the native ad boundaries by determining width and height or setting box constraints for the container. It can also handle the native ad elements styling, such as: title, body, advertiser and call to action button.
Note: For native templates the default type is SMALL and can be altered by defining the template type on the widget creation.
<LevelPlayNativeAdView
    style={{
       width: 300,// Recommended width for Medium Type
       height: 350 // Recommended height for Medium Type
    }}
    nativeAd={nativeAd}
    templateType={LevelPlayTemplateType.Medium}
    templateStyle={[[LevelPlayNativeAdTemplateStyle] optional]}
  />
<LevelPlayNativeAdView
    style={{
       width: 300,// Recommended width for Small Type
       height: 175 // Recommended height for Small Type
    }}
    nativeAd={nativeAd}
    templateType={LevelPlayTemplateType.Small}
    templateStyle={[[LevelPlayNativeAdTemplateStyle] optional]}
  />
Step 3. Load the ad
Call loadAd method to load a native ad. It can be called on useEffect hook or in another timing decided by the developer.
nativeAd?.loadAd();Step 4. Destroy the Native Ad
To destroy a native ad, call the following method:
nativeAd?.destroyAd();A destroyed native ad can no longer be loaded. If you want to serve it again, you must recreate the ad container component.
Custom Templates Setup
Custom templates allow you to design your own styles and features to fit your specific needs. They provide the flexibility to personalize layouts and functionalities, ensuring a unique user experience.
These templates are mainly used when a higher level of control over the ad design is desired. It can be implemented for both Android and iOS platforms and require additional code implementation.
To create custom templates, you’ll need to write native code and develop your own custom layouts. Follow the steps below for integration:
Step 1. Create NativeAdViewManager
The Android or iOS implementation of the class that will extend LevelPlayNativeAdViewManager and display the loaded ad with your customized layout.
Android
// Android Implementation
import android.widget.Button
import android.widget.ImageView
import android.widget.TextView
import com.facebook.react.bridge.ReactApplicationContext
import com.ironsource.mediationsdk.ads.nativead.LevelPlayMediaView
import com.ironsource.mediationsdk.ads.nativead.LevelPlayNativeAd
import com.ironsource.mediationsdk.ads.nativead.NativeAdLayout
import com.ironsource.react_native_mediation.R
import com.ironsource.react_native_mediation.RCTLevelPlayNativeAdViewManager
class NativeAdViewManagerExample(
  reactApplicationContext: ReactApplicationContext,
  layoutId: Int
): RCTLevelPlayNativeAdViewManager(reactApplicationContext, layoutId) {
  override fun bindNativeAdToView(nativeAd: LevelPlayNativeAd?, nativeAdLayout: NativeAdLayout) {
    // Extract views
    val titleView = nativeAdLayout.findViewById<TextView>(R.id.adTitle)
    val bodyView = nativeAdLayout.findViewById<TextView>(R.id.adBody)
    val advertiserView = nativeAdLayout.findViewById<TextView>(R.id.adAdvertiser)
    val callToActionView = nativeAdLayout.findViewById<Button>(R.id.adCallToAction)
    val iconView = nativeAdLayout.findViewById<ImageView>(R.id.adAppIcon)
    val mediaView: LevelPlayMediaView? = nativeAdLayout.findViewById(R.id.adMedia)
    // Bind native ad to view
    if (nativeAd != null) {
      if (nativeAd.title != null) {
        titleView.text = nativeAd.title
        nativeAdLayout.setTitleView(titleView)
      }
      if (nativeAd.body != null) {
        bodyView.text = nativeAd.body
        nativeAdLayout.setBodyView(bodyView)
      }
      if (nativeAd.advertiser != null) {
        advertiserView.text = nativeAd.advertiser
        nativeAdLayout.setAdvertiserView(advertiserView)
      }
      if (nativeAd.callToAction != null) {
        callToActionView.text = nativeAd.callToAction
        nativeAdLayout.setCallToActionView(callToActionView)
      }
      if (nativeAd.icon != null) {
        iconView!!.setImageDrawable(nativeAd.icon!!.drawable)
        nativeAdLayout.setIconView(iconView)
      }
      if (mediaView != null) {
        nativeAdLayout.setMediaView(mediaView)
      }
      nativeAdLayout.registerNativeAdViews(nativeAd)
    }
  }
  override fun getName(): String {
    return "ExampleViewType"
  }
}
iOS
// iOS Implementation
/// h file
#import <Foundation/Foundation.h>
#import <IronSource/IronSource.h>
#import "RCTLevelPlayNativeAdViewManager.h"
@interface NativeAdViewManagerExample : RCTLevelPlayNativeAdViewManager <RCTLevelPlayNativeAdViewManagerDelegate>
@end
/// m file
#import "NativeAdViewManagerExample.h"
@implementation NativeAdViewManagerExample
RCT_EXPORT_MODULE(ExampleViewType) // View type definition
- (instancetype)init
{
  self = [super initWithDelegate:self layoutName:@"MyCustomNativeAdViewTemplate"];
  return self;
}
- (void)bindNativeAdToView:(LevelPlayNativeAd *)nativeAd isNativeAdView:(ISNativeAdView *)isNativeAdView {
    // Extract views
    UILabel *titleView = isNativeAdView.adTitleView;
    UILabel *bodyView = isNativeAdView.adBodyView;
    UILabel *advertiserView = isNativeAdView.adBodyView;
    UIButton *callToActionView = isNativeAdView.adCallToActionView;
    UIImageView *iconView = isNativeAdView.adAppIcon;
    LevelPlayMediaView *mediaView = isNativeAdView.adMediaView;
    // Bind native ad to view
    if (nativeAd != nil) {
        if (nativeAd.title != nil) {
            titleView.text = nativeAd.title;
            [isNativeAdView setAdTitleView:titleView];
        }
        if (nativeAd.body != nil) {
            bodyView.text = nativeAd.body;
            [isNativeAdView setAdBodyView:bodyView];
        }
        if (nativeAd.advertiser != nil) {
            advertiserView.text = nativeAd.advertiser;
            [isNativeAdView setAdAdvertiserView:advertiserView];
        }
        if (nativeAd.callToAction != nil) {
            [callToActionView setTitle:nativeAd.callToAction forState:UIControlStateNormal];
            [isNativeAdView setAdCallToActionView:callToActionView];
        }
        if (nativeAd.icon != nil) {
            iconView.image = nativeAd.icon.image;
            [isNativeAdView setAdAppIcon:iconView];
        }
        if (mediaView != nil) {
            [isNativeAdView setAdMediaView:mediaView];
        }
        // Register native ad views with the provided native ad
        [isNativeAdView registerNativeAdViews:nativeAd];
    }
}
@end
Note: Your custom view type string should match the viewType specified in the LevelPlayNativeAdView component on the React Native side
- For Android, you should return the view type string in the overridden getName method. you should return to the override method getName the view type string.
- For iOS, the view type string should be specified inmentioned in RCT_EXPORT_MODULE.
Step 2. Register your NativeAdViewManager for Android
Once you’ve created a custom native ad class that extends the LevelPlayNativeAdViewManager class, register your Android class in the MainApplication.
Note: Your custom view type string must match the viewType set in the LevelPlayNativeAdView component on the React Native side. For iOS, no additional setup is needed since the module export serves as registration.
 // Android Implementation
package com.ironsource.reactnativetester
import android.app.Application
import com.facebook.react.PackageList
import com.facebook.react.ReactApplication
import com.facebook.react.ReactHost
import com.facebook.react.ReactNativeHost
import com.facebook.react.ReactPackage
import com.facebook.react.defaults.DefaultNewArchitectureEntryPoint.load
import com.facebook.react.defaults.DefaultReactHost.getDefaultReactHost
import com.facebook.react.defaults.DefaultReactNativeHost
import com.facebook.soloader.SoLoader
import com.ironsource.react_native_mediation.IronSourceMediationPackage
class MainApplication : Application(), ReactApplication {
  override val reactNativeHost: ReactNativeHost =
      object : DefaultReactNativeHost(this) {
        override fun getPackages(): List<ReactPackage> =
            PackageList(this).packages.apply {
              // Packages that cannot be autolinked yet can be added manually here, for example:
                add(CustomPackage())
            }
        override fun getJSMainModuleName(): String = "index"
        override fun getUseDeveloperSupport(): Boolean = BuildConfig.DEBUG
        override val isNewArchEnabled: Boolean = BuildConfig.IS_NEW_ARCHITECTURE_ENABLED
        override val isHermesEnabled: Boolean = BuildConfig.IS_HERMES_ENABLED
      }
  override val reactHost: ReactHost
    get() = getDefaultReactHost(applicationContext, reactNativeHost)
  override fun onCreate() {
    super.onCreate()
    SoLoader.init(this, false)
    if (BuildConfig.IS_NEW_ARCHITECTURE_ENABLED) {
      // If you opted-in for the New Architecture, we load the native entry point for this app.
      load()
    }
    // Register custom view managers
    IronSourceMediationPackage.registerViewManager([YOUR_UNIQUE_VIEW_TYPE]) { reactContext ->
        NativeAdViewManagerExample(reactContext, R.layout.my_custom_native_ad_view)
    }
  }
}
- For an example of configuring your NativeAdView layout on Android see my_custom_native_ad_view_template.xml.
- For an example of configuring your NativeAdView layout on iOS see MyCustomNativeAdViewTemplate.xib.
Step 3. Create LevelPlayNativeAdView
Create a LevelPlayNativeAdView component to define the container that will host the loaded native ad. This object will define the native ad boundaries by determining width and height or setting box constraints for the container. It can also handle the native ad elements styling, such as: title, body, advertiser and call to action button.
Note: When creating custom templates, ensure the viewType aligns with the unique view type specified in the native Android or iOS sections. There’s no need for a template type definition, as you’re free to style your view according to your preferences.
<LevelPlayNativeAdView
    style={{
       width: [WIDTH],// Your recommended width
       height: [HEIGHT] // Your recommended height
    }}
    nativeAd={nativeAd}
    templateStyle={[[LevelPlayNativeAdTemplateStyle] optional]}
    viewType={[YOUR_UNIQUE_VIEW_TYPE_STRING]}
  />
Step 4. Load the ad
Call loadAd method to load a native ad. It can be called on useEffect or in another timing decided by the developer.
nativeAd?.loadAd();
Step 5. Destroy the Native Ad
To destroy a native ad, invoke the destroyAd method of the native ad object.
nativeAd?.destroyAd();
A destroyed native ad can no longer be loaded. If you want to serve it again, you must recreate the ad container component.
Done!
You can now deliver Native Ads through LevelPlay.