
HyprMX Mediation Integration Guide
This guide will instruct you step-by-step on how to set HyprMX live as an Ad Network on Unity LevelPlay Mediation.
- Make sure you have correctly integrated ironSource SDK’s Rewarded Video or Interstitial into your application.
- In case you upgrade from lower adapter versions to 4.1.2 onwards, please make sure you reconfigure their HyprMX parameters within the platform to new ones. In order to get HyprMX new parameters, you should contact integration@hyprmx.com.
- HyprMX Android SDK Show ads for Android Operating Systems Version 5.0 (API level 21) and up.
- HyprMX iOS SDK 5.4.0+ supports Cocoapods 1.9.1+
- The HyprMX iOS SDK currently compiles on iOS 8+ but only serves ads on iOS 12+.
Step 1. Create an HyprMX Account
HyprMX provides a managed service. To create an account with them, contact them directly at integration@hyprmx.com. Once your account is created, they will help you set up your application and retrieve the required parameters to activate HyprMx in your ironSource account.
Step 2. Activate HyprMX in Your ironSource Network Setup Module
There are 3 pieces of data from the HyprMX account which need to be inserted into your ironSource Network Setup Module in order for HyprMX to work correctly in connection with ironSource:
| API Key | This is the unique identifier of your account in the HyprMX system. |
| Distributor ID | This is the unique Application identifier which HyprMX will deliver ads to. |
| Placement Name | This is a unique identifier of your Placement with HyprMX. |
Once you obtain this information, you must configure HyprMX’s Parameters in your ironSource Account. By adding the above information correctly, you will be able to take full advantage of HyprMX’s ad inventory and reporting data on Unity LevelPlay Mediation.
Configure HyprMX’s Parameters into ironSource Account
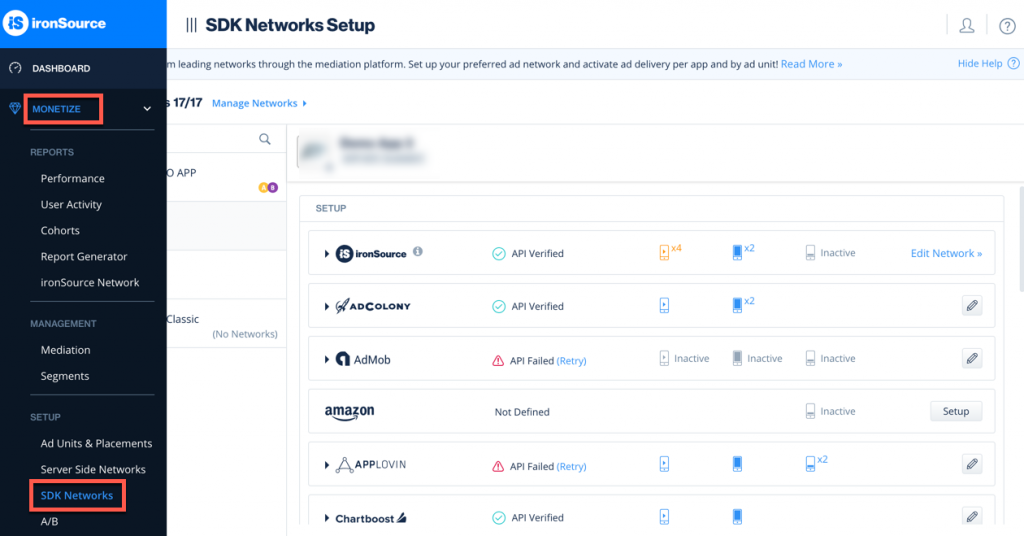
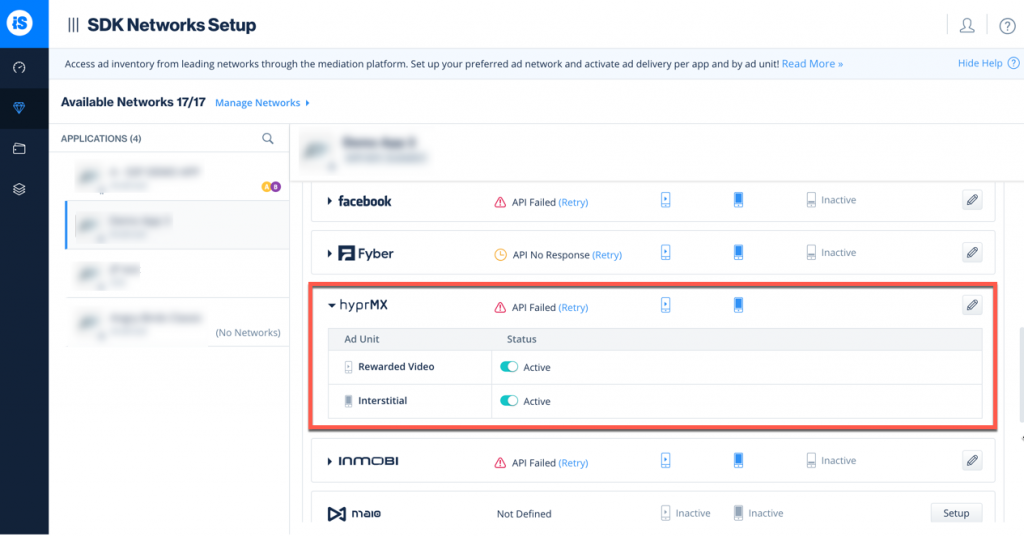
- Once you obtain the above parameters, log in to your ironSource account and go to ‘Monetize‘ ➣ ‘SDK Networks‘:
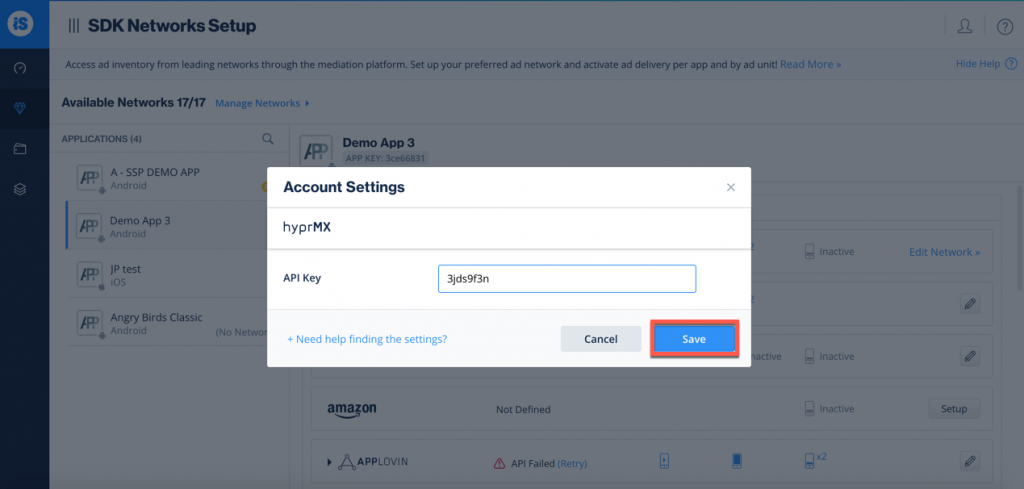
- Select HyprMX from the list of available Ad Networks and input the HyprMX ‘API Key‘.

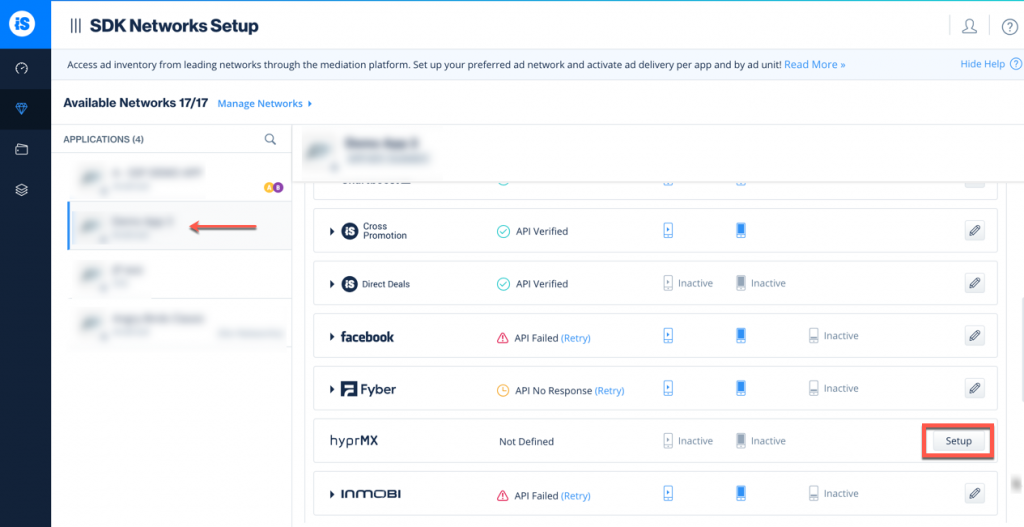
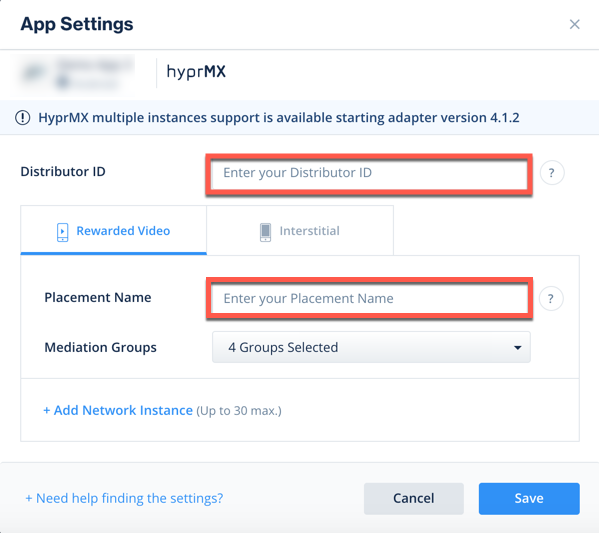
- Next, select the app on which you’d like to run Unity LevelPlay Mediation with HyprMX and click on the ‘Setup’ button. Then enter the ‘Distributor ID‘ and ‘Placement Name‘ in the relevant fields.
- You will then see HyprMX as Active for Mediation on the Setup Dashboard.
Step 3. Add the HyprMX Adapter to Your Build
Unity Integration Manager (Recommended)
Once you’ve completed SDK integration, you can download HyprMX Adapter, using the Unity Integration Manager.
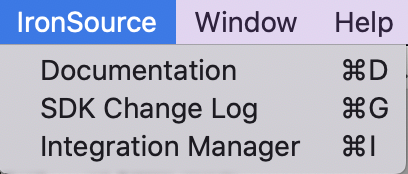
In your Unity Development platform, go to ironSource > Integration Manager
If you already have the latest version of the adapters, the action button will be changed to “Updated”, and will be disabled.
iOS
Integrating HyprMX SDK 6.0.0+, Adapter version 4.1.17+
- Go to Assets > External Dependency Manager > iOS Resolver > Settings
- Check “Always add the main target to Podfile”
- Remove from your project the script Assets/IronSource/Editor/EmbedHyprMXBinary.cs as it is no longer used.

Integrating HyprMX SDK < 5.1.5, Adapter version < 4.1.16
HyprMx XCFramework is required to be “Embed & Sign”.
Add the Post-Process script to your Unity Project Assets/IronSource/Editor.
You can download the script from here.
Android (Manual Resolve)
To apply your changes, make sure you use the “Resolve” process. This will download all relevant artifacts, according to your choices. For detailed information see instructions here.
Android Plugin Manual Integration
- Download the HyprMX Android Adapter:
Download adapter from here.
- Add the HyprMX files to your Unity project:
Import the files into Assets/Plugins/Android/.
-
As of ironSource Android SDK Version 6.17.0 (HyprMx Android adapter version 4.1.5+), HyprMx adapter will be released as AAR. Only if you intend to keep your Jar integration, make sure to add the manifest activities noted in the Android documentation.
iOS Plugin Manual Integration
- Download the HyprMX iOS adapter:
Download the adapter and SDK (XCFrameworks) files from here. - Add the HyprMX adapter file to your Unity project:
Import adapter and frameworks file into Assets/Plugins/iOS
- Add the SDK to your Xcode project:
As Unity3D do not support XCFrameworks, please ad the SDK XCFrameworks directly to your Xcode project. - Set the XCFramework Embed setting to “Embed & Sign”.
iOS XCode Project setup
- Configure App Transport Security (ATS) Settings
HyprMX recommends that the ATS settings are turned off. To achieve this, include the App Transport Security dictionary key in your Info.plist as follows:
<key>NSAppTransportSecurity</key>
<dict>
    <key>NSAllowsArbitraryLoads</key>
    <true/>
</dict>
If you prefer to enable ATS, add the following keys to your plists:<dict> <key>NSAllowsArbitraryLoads</key> <true/> <key>NSAllowsArbitraryLoadsForMedia</key> <true/> <key>NSAllowsArbitraryLoadsInWebContent</key> <true/> </dict>When you submit your application, you will have to provide justification for these ATS settings. HyprMX recommends you note that your ad partners require loading web content from a variety of sources, including those that do not yet support HTTPS. Apple has already agreed that this is acceptable justification in their documentation.
- plist declaration
iOS requires that the use of a user’s camera, calendar, photo library, etc. be declared by advertisers in the plist. Add all of the following entries to your app’s plist.
<key>NSCameraUsageDescription</key>
    <string>${PRODUCT_NAME} requests write access to the Camera</string>
<key>NSPhotoLibraryAddUsageDescription</key>
    <string>${PRODUCT_NAME} requests write access to the Photo Library</string>
<key>NSUserTrackingUsageDescription</key>
    <string>${PRODUCT_NAME} would like to show you personalized ads</string>
Evaluate Your Ad Network Integration
- Verify your ad network integration with our Integration Helper. The ironSource SDK provides a tool to ensure you’ve successfully integrated our SDK as well as any additional network adapters.
- Manage the debug logs for your integrated mediation ad networks with this boolean
IronSource.Agent.setAdaptersDebug(true);
When set to TRUE, this line of code will enable debug logs to help you troubleshoot issues with all of the mediation ad networks that permit to do so. Remove this code before your app goes live with our ad units! Supported for SDK versions 6.5.2 and up.
Step 4. HyprMX Additional Settings
Age Restricted Users
Unity LevelPlay mediation lets publishers communicate HyprMX ageRestrictedUser settings directly to the HyprMX network. This feature is enabled using ironSource SDK 7.2.4+, HyprMX Unity Adapter 4.3.2+.
According to HyprMX, setting the ageRestrictedUser parameter is recommended for all users within applications that participate in Google Play’s Designed for Families program, are listed in Google Play’s Family section, or include children as one of the target audiences to prevent access to the AAID for end-users flagged as children.
Set the flag before initializing ironSource SDK.
Use the following syntax, to set HyprMX flag with ageRestrictedUser the parameter True:
IronSource.Agent.setMetaData("HyprMX_ageRestricted","true");Use the following syntax, to set HyprMX flag with ageRestrictedUser the parameter False:
IronSource.Agent.setMetaData("HyprMX_ageRestricted","false");Done!
You are now all set to deliver HyprMX within your application!
To leverage additional ad networks through Unity LevelPlay Mediation, integrate the adapters and follow our integration guides.