
Unity Plugin Integration
Unity LevelPlay mediation supports Unity version 2017.2 +, and Android operating systems version 4.4 (API level 19)+.
iOS version support is defined per network. ironSource ads and LevelPlay mediation supports iOS versions 11+, XCode version 14.3.1+.
As of ironSource SDK 7.3.0, the minimum supported Kotlin version is 1.7.0.
The SDK download, use, and access are subject to the ironSource Platform Online Terms and Conditions. If you disagree with ironSource Mobile SDK Publisher Online Terms & Conditions, do not download, access, or use the SDK or the underlying services.
To be compatible with Apple’s privacy requirements, ironSource SDK supports both SKAdNetwork attribution and iOS Privacy Manifest. You can learn more about it here.
Learn more about adapters support for AndroidX.
Important! If you have previously integrated version 8.0.0 of the Unity Plugin, you will need to update your Unity Package to a newer version by downloading the new version and importing it into your project. If you are currently using version 7.X.X of the Unity Plugin, you should follow the migration steps here to upgrade smoothly to 8.0.0+.
Step 1. Add the LevelPlay Unity package to your project
To upgrade from an earlier version of the Unity Plugin to 8.0.0+, follow this guide.
Complete the following to add the IronSource Unity Package for LevelPlay to your project using the Unity Plugin:
- Download Unity Plugin Version 8.2.0
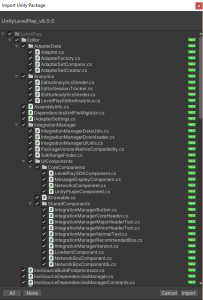
- Make sure your Unity project is opened and import the Unity package.
- Double-click on the extracted file; the different files will be populated automatically, as shown below:
The ironSource SDK works with the Android & iOS platforms. The Unity Editor contains a Simulator to work with Unity code. To work with our plugin, you must target an Android or iOS build to test the integration.
Add Ad Quality SDK
- Download the Ad Quality dependency XML
- Copy the XML to Assets/LevelPlay/Editor in your project
Unity LevelPlay demo app
The Integration Demo application demonstrates how to integrate Unity LevelPlay mediation in your app.
Download the Unity Demo Application
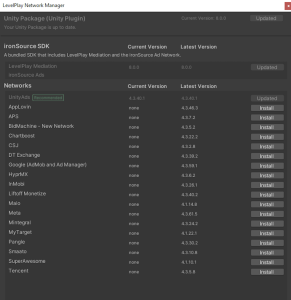
Step 2. LevelPlay Network Manager – Recommended
Install the adapters of your preferred ad networks. Follow the ad network integration guides on the menu to your left to properly set up the ad networks.
Pre-requisites
- Unity Developer Version 2017.2 or above
- For iOS – Cocoapods applied
Manage SDK versions
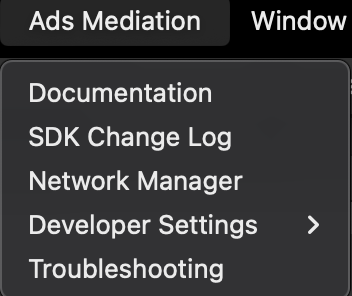
Once you’ve updated your Unity package for the new SDK and Network Manager, you can view the Ads Mediation menu in the Unity menu bar.
To upgrade your SDK or Adapter versions:
- Go to Ads Mediation > Network Manager
- Choose “Install” or “Update.”
If you already have the latest ironSource SDK or Adapters version, the action button will be changed to “Updated” and disabled.
Android
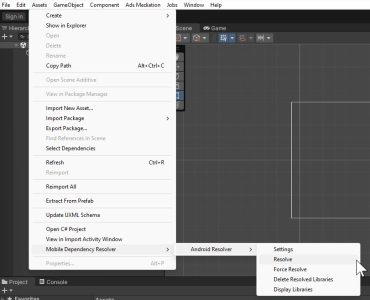
To apply your changes, use the “Resolve” process. This will download all relevant artifacts according to your choices.
Manual resolve
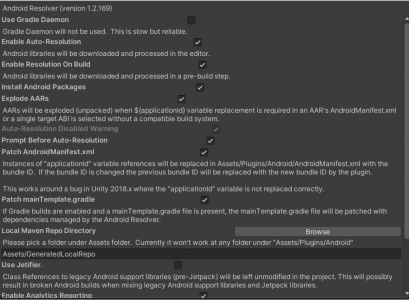
Go to: Assets → Mobile Dependency Manager → Android Resolver → Resolve
You should do this after each change in the LevelPlay Network Manager
All updates will be performed when closing the Network Manager window if you’re using Automatic Resolve.
For Gradle users
Using the LevelPlay Network Manager for Unity, you can avoid downloading the Android artifacts into your project. Instead, the artifacts will be added to your gradle file during the compilation.
To enable this process, follow these steps:
- Go to: Project Settings -> Player -> Android -> Publishing Settings
- Enable Custom Main Gradle Template
- Go to: Assets → Mobile Dependency Manager → Android Resolver → Settings
- Select “Patch mainTemplate.gradle”
- Save your changes, by pressing “OK”
iOS
Make sure that Cocoapods is installed:
Go to: Assets → Mobile Dependency Manager → iOS Resolver → Install Cocoapods
Step 3. Additional settings for iOS
Add Ad-Support to your Xcode project
Our Unity Plugin usually adds all the required frameworks automatically. In some cases, the AdSupport.framework can’t be added automatically using Unity 5.6. Verify if the framework has been added and in the case it has not been added automatically, make sure to add it manually.
SKAdNetwork support
To enable the display of ironSource network ads while using SDK 7+, make sure to include the ironSource ad network ID in your app property list file (Info.plist).
- Select Info.plist in the Project navigator in Xcode
- Click the Add button (+) beside a key in the property list editor and press Return
- Type the key name SKAdNetworkItems
- Choose Array from the pop-up menu in the Type column
- Create a dictionary item, and below it a single sting item
- Enter Key name SKAdNetworkIdentifier, and the key value:
su67r6k2v3.skadnetwork
You can also add SKAdNetworkIdentifier to your Info.plist, by using this code:
<key>SKAdNetworkItems</key>
<array>
   <dict>
      <key>SKAdNetworkIdentifier</key>
      <string>su67r6k2v3.skadnetwork</string>
   </dict>
</array>
For more information on editing the property list, see the Xcode documentation.
App transport security settings
To ensure uninterrupted support for ironSource ad delivery across all mediation networks, it’s important to make the following changes in your info.plist:
- Add in a dictionary called ‘NSAppTransportSecurity‘. Make sure you add this dictionary on the ‘Top Level Key‘.
- Inside this dictionary, add a Boolean called ‘NSAllowsArbitraryLoads‘ and set it to YES.

- Make sure that your info.plist does not contain any other exceptions besides ‘NSAllowsArbitraryLoads‘, as this might create a conflict.
- Find more information on ATS here.
Step 4. Additional setup for Android
Apps updating their target API level to 33 (Android 13) will need to declare a Google Play services normal permission in the manifest file as follows:
<uses-permission android:name="com.google.android.gms.permission.AD_ID"/>Read more about Google Advertising ID changes here.
Unity 2020 Requirements
If you are using Unity 2020+, add the following gradle properties to android/gradle.properties:
android.enableDexingArtifactTransform=falseStep 5. Manual integration
As an alternative to Unity Integration Manager, you can manually integrate ironSource SDK.
Android manual integration
- Download Android SDK Version 8.2.1
- Download Ad Quality SDK
- Copy .aar file to /Assets/Plugins/Android
Google identifier permissions
ironSource SDK requires google play services Basement and google play services Identifier, while other networks may also require additional google play services.
Add the Play Services dependencies into the dependencies block, to allow GAID and APP Set ID information to be retrieved.
dependencies {
    implementation fileTree(dir: 'libs', include: ['*.jar'])
    implementation 'com.google.android.gms:play-services-appset:16.0.0'
    implementation 'com.google.android.gms:play-services-ads-identifier:17.0.0'
    implementation 'com.google.android.gms:play-services-basement:17.1.1'
}
Learn more about Google’s app set id here.
iOS manual integration
- Download iOS SDK Version 8.2.0
- Unzip the file and add IronSource.framework into /Assets/Plugins/iOS
- Download Ad Quality SDK
- Unzip the file and add IronSourceAdQuality.xcframework into /Assets/Plugins/iOS
- Import libraries – “z”,”sqlite3.0″ into xcode project
- Import frameworks – “JavaScriptCore”,”WebKit”,”AdSupport”,”SystemConfiguration” into xcode project
Step 6. Initialize the ad units
- ironSource supports optional SDK settings such as UserID and Segments that must be configured before you initialize the SDK. See our guide on Advanced Settings for setup instructions
- If you plan to get user authorization (iOS 14) using a pop-up whenever your app is launched, we recommend that you perform this action before you init ironSource SDK. You can learn more about App Tracking Transparency on Apple’s documentation
- If you don’t ask for user authorization (iOS 14) upon app launch, init the ironSource SDK immediately upon launch
- If you’re using server-to-server callbacks to reward your users with ironSource rewarded ad units, or using Ad Quality user journey, set the UserID
Application State
First, you’ll need to pass the state of the application by executing the following event function during the Application Lifecycle.
Call onApplicationPause in each of the Unity Scenes:
void OnApplicationPause(bool isPaused) {
  IronSource.Agent.onApplicationPause(isPaused);
}
Init the plugin and ad units
You can initialize the plugin in two ways. We recommend the first method as it will fetch the specific ad units you define.
- This method will init the specific ad units mentioned in the adUnits parameter:
IronSource.Agent.init (YOUR_APP_KEY, IronSourceAdUnits.REWARDED_VIDEO, IronSourceAdUnits.INTERSTITIAL, IronSourceAdUnits.BANNER);
When using this init approach, you can now initialize each ad unit separately at different touchpoints in your app flow in one session.
//For Rewarded Video
IronSource.Agent.init (YOUR_APP_KEY, IronSourceAdUnits.REWARDED_VIDEO);
//For Interstitial
IronSource.Agent.init (YOUR_APP_KEY, IronSourceAdUnits.INTERSTITIAL);
//For Banners
IronSource.Agent.init (YOUR_APP_KEY, IronSourceAdUnits.BANNER);
- Alternatively, you can init the SDK as detailed below and the SDK will init the ad units you’ve configured on the ironSource platform:
IronSource.Agent.init (YOUR_APP_KEY);
ironSource Init Complete Listener
The ironSource SDK fires postback to inform you that the ironSource SDK was initialized successfully, for ironSource SDK 7.2.1+ . This listener will provide you an indication that the initialization process was completed, and you can start loading ads. The callback will be sent once per session, and will indicate the first initialization of the SDK.
IronSourceEvents.onSdkInitializationCompletedEvent += SdkInitializationCompletedEvent;
private void SdkInitializationCompletedEvent(){}
Step 7. Verify your integration
The ironSource SDK provides an easy way to verify that your Rewarded Video Mediation integration was completed successfully. To verify your ironSource SDK integration as well as any additional Ad Networks you have implemented, simply add this method to your project:
IronSource.Agent.validateIntegration();
For more details on the ironSource Integration Verification tool navigate to this article.
For Proguard Users Only
If you are using ProGuard with the ironSource SDK, you must add the following code to your ProGuard file (Android Studio: proguard-rules.pro or Eclipse: proguard-project.txt):
-keepclassmembers class * implements android.os.Parcelable {
    public static final android.os.Parcelable$Creator *;
}
#noinspection ShrinkerUnresolvedReference
#unity
-keep class com.ironsource.unity.androidbridge.** { *;}
-keep class com.google.android.gms.ads.** {public *;}
-keep class com.google.android.gms.appset.** { *; }
-keep class com.google.android.gms.tasks.** { *; }
#adapters
-keep class com.ironsource.adapters.** { *; }
#sdk
-dontwarn com.ironsource.**
-dontwarn com.ironsource.adapters.**
-keepclassmembers class com.ironsource.** { public *; }
-keep public class com.ironsource.**
-keep class com.ironsource.adapters.** { *;
}
#omid
-dontwarn com.iab.omid.**
-keep class com.iab.omid.** {*;}
#javascript
-keepattributes JavascriptInterface
-keepclassmembers class * { @android.webkit.JavascriptInterface <methods>; }
#For AmazonAps integration
-keep class com.amazon.device.ads.DtbThreadService {
    static *;
}
-keep public interface com.amazon.device.ads** {*; }
#For AppLovin integration
-keepclassmembers class com.applovin.sdk.AppLovinSdk {
    static *;
}
-keep public interface com.applovin.sdk** {*; }
-keep public interface com.applovin.adview** {*; }
-keep public interface com.applovin.mediation** {*; }
-keep public interface com.applovin.communicator** {*; }
#For Bytedance integration
-keep public interface com.bytedance.sdk.openadsdk** {*; }
#For Facebook integration
-keepclassmembers class com.facebook.ads.internal.AdSdkVersion {
    static *;
}
-keepclassmembers class com.facebook.ads.internal.settings.AdSdkVersion {
    static *;
 }
-keepclassmembers class com.facebook.ads.BuildConfig {
    static *;
 }
-keep public interface com.facebook.ads** {*; }
#For Fairbid
-keep public interface com.fyber.fairbid.ads.interstitial** {*; }
-keep public interface com.fyber.fairbid.ads.rewarded** {*; }
-keep class com.fyber.offerwall.*
#For Fivead
-keep public interface com.five_corp.ad** {*; }
#For Fyber(Inneractive) integration
-keep public interface com.fyber.inneractive.sdk.external** {*; }
-keep public interface com.fyber.inneractive.sdk.activities** {*; }
-keep public interface com.fyber.inneractive.sdk.ui** {*; }
#For HyprMX integration
-keepclassmembers class com.hyprmx.android.sdk.utility.HyprMXProperties {
    static *;
}
-keepclassmembers class com.hyprmx.android.BuildConfig {
    static *;
}
-keep public interface com.hyprmx.android.sdk.activity** {*; }
-keep public interface com.hyprmx.android.sdk.graphics** {*; }
# For Inmobi integration
-keep class com.inmobi.*
-keep public interface com.inmobi.ads.listeners** {*; }
-keep public interface com.inmobi.ads.InMobiInterstitial** {*; }
-keep public interface com.inmobi.ads.InMobiBanner** {*; }
# For ironSource integration
-keep public interface com.ironsource.mediationsdk.sdk** {*; }
-keep public interface com.ironsource.mediationsdk.impressionData.ImpressionDataListener {*; }
#For Maio integration
-keep public interface jp.maio.sdk.android.MaioAdsListenerInterface {*; }
# For Mintergral integration
-keep public interface com.mbridge.msdk.out** {*; }
-keep public interface com.mbridge.msdk.videocommon.listener** {*; }
-keep public interface com.mbridge.msdk.interstitialvideo.out** {*; }
-keep public interface com.mintegral.msdk.out** {*; }
-keep public interface com.mintegral.msdk.videocommon.listener** {*; }
-keep public interface com.mintegral.msdk.interstitialvideo.out** {*; }
#For MyTarget integration
-keep class com.my.target.** {*;}
#For Ogury integration
-keep public interface io.presage.interstitial** {*; }
-keep public interface io.presage.interstitial.PresageInterstitialCallback {*; }
#For Pubnative integration
-keep public interface net.pubnative.lite.sdk.interstitial.HyBidInterstitialAd** {*; }
-keep public interface net.pubnative.lite.sdk.rewarded.HyBidRewardedAd** {*; }
-keep public interface net.pubnative.lite.sdk.views.HyBidAdView** {*; }
#For Smaato integration
-keep public interface com.smaato.sdk.interstitial** {*; }
-keep public interface com.smaato.sdk.video.vast** {*; }
-keep public interface com.smaato.sdk.banner.widget** {*; }
-keep public interface com.smaato.sdk.core.util** {*; }
# For Tapjoy integration
-keep public interface com.tapjoy.** {*; }
# For Tencent integration
-keep public interface com.qq.e.ads.interstitial2** {*; }
-keep public interface com.qq.e.ads.interstitial3** {*; }
-keep public interface com.qq.e.ads.rewardvideo** {*; }
-keep public interface com.qq.e.ads.rewardvideo2** {*; }
-keep public interface com.qq.e.ads.banner2** {*; }
-keep public interface com.qq.e.comm.adevent** {*; }
#For Verizon integration
-keepclassmembers class com.verizon.ads.edition.BuildConfig {
    static *;
}
-keep public interface com.verizon.ads.interstitialplacement** {*; }
-keep public interface com.verizon.ads.inlineplacement** {*; }
-keep public interface com.verizon.ads.vastcontroller** {*; }
-keep public interface com.verizon.ads.webcontroller** {*; }
#For Vungle integration
-keep public interface com.vungle.warren.PlayAdCallback {*; }
-keep public interface com.vungle.warren.ui.contract** {*; }
-keep public interface com.vungle.warren.ui.view** {*; }
#For AndroidX
-keep class androidx.localbroadcastmanager.content.LocalBroadcastManager { *;}
-keep class androidx.recyclerview.widget.RecyclerView { *;}
-keep class androidx.recyclerview.widget.RecyclerView$OnScrollListener { *;}
#For Android
-keep class * extends android.app.Activity
Done!
You’re now ready to start working with ironSource’s ad units and mediation tools.
What’s Next?
Once you’ve verified your integration with the Integration Helper, follow our integration guides and implement our Ad Units:
Interested in Mediation? Integrate our Rewarded Video or Interstitial Ads in your app and follow our Mediation articles.