
Permission pop-up iOS
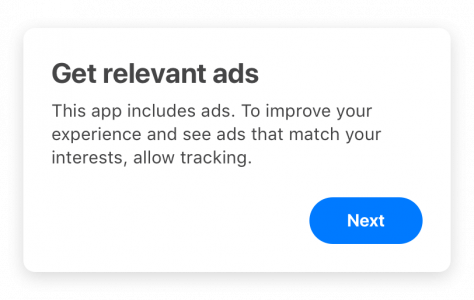
The pre permission pop-up is used to improve the likelihood of receiving tracking authorization from your app users. It is designed to appear before your app calls Apple’s App Tracking Transparency (ATT) prompt, and provides a soft-launch to Apple’s ATT prompt to help you to optimize your users permissions opt-in.
ironSource’s pre permission pop-up should be used before triggering Apple’s ATT prompt. This will help convey to your users the value of app tracking prior to their decision to consent to the opt-in process.
When you should display the pop up
Call the pre permission pop-up when the user’s authorization status is NotDetermined and after the SDK is initialized. We recommend you display the pop-up only to iOS14+ users.
What you need to know about the pop up
- The text is fixed, and cannot be changed
- The popup should precede Apple’s ATT prompt requestTrackingAuthorizationWithCompletionHandler and should not prevent the display of the ATT prompt itself
- We recommend you explain your implementation of the ATT process in your app’s Review Notes, emphasizing that the ATT prompt request is not dependent on the pre pop-up display
- If you use any other regulation prompts (GDPR, COPPA, etc.), you should make sure that the text in the permission pop-up is aligned with the text in any other prompts in your app
How to enable the permission pop-up API and postbacks
- Check that you’ve integrated ironSource SDK 7.0.4+
- Register to ConsentView delegates
- Add the pop-up APIs and postbacks
Step 1: Integrate ironSource SDK
Integrate ironSource SDK 7.0.4+: iOS | Unity, 1.0.0+: Flutter | React Native
Step 2: Register to ConsentView delegates
The ironSource SDK fires postbacks to inform you about the pop-up status and user’s response to it. This is done via registration to the ConsentView postbacks, and should be set before initializing the ironSource SDK.
IronSourceEvents.onConsentViewDidAcceptEvent += onConsentViewDidAcceptEvent;
IronSourceEvents.onConsentViewDidFailToLoadWithErrorEvent += onConsentViewDidFailToLoadWithErrorEvent;
IronSourceEvents.onConsentViewDidLoadSuccessEvent += onConsentViewDidLoadSuccessEvent;
IronSourceEvents.onConsentViewDidFailToShowWithErrorEvent += onConsentViewDidFailToShowWithErrorEvent;
IronSourceEvents.onConsentViewDidShowSuccessEvent += onConsentViewDidShowSuccessEvent;
Once you register to the listener, you’ll be able to receive notifications upon the following events. Make sure to use “pre” as consentViewType for all your APIs and Callbacks when displaying the ironSource pre permission pop-up.
Load and Display statuses
// Consent View was loaded successfully
private void onConsentViewDidShowSuccessEvent(string consentViewType)
{
}
// Consent view was failed to load
private void onConsentViewDidFailToShowWithErrorEvent(string consentViewType, IronSourceError error)
{
}

// Consent view was displayed successfully
private void onConsentViewDidLoadSuccessEvent(string consentViewType)
{
}

// Consent view was not displayed, due to error
private void onConsentViewDidFailToLoadWithErrorEvent(string consentViewType, IronSourceError error)
{
}
// The user pressed the Settings or Next buttons
private void onConsentViewDidAcceptEvent(string consentViewType){
}
Example:
// The user pressed the Settings or Next buttons
IronSource.Agent.onConsentViewDidAcceptEvent("pre")
Step 3: Add the pop-up APIs and postbacks
To display the ironSource permission pop-up, follow the steps below. Make sure to load the pop-up only after the initialization process is completed.
- Load the pop-up using the API method loadCosnetView with the relevant type.
IronSource.Agent.loadConsentViewWithType("pre"); - Once the pop-up is loaded, you can show it using the API method showConsentView. Check your user’s authorization status to optimize the process.
IronSource.Agent.showConsentViewWithType("pre");