
PubMatic Integration Guide
This guide will instruct you step-by-step on how to set up PubMatic as an Ad Network on Unity LevelPlay.
Step 1: Create a PubMatic account
- Go to the PubMatic website and create an account.
- Wait for your account to be approved.
- Sign in to the Pubmatic monetization dashboard.
Step 2: Create an app and ad units
Add your app
Add your app and configure your ad units in the PubMatic dashboard before you can activate PubMatic in LevelPlay.
- Log in to the Pubmatic monetization dashboard.
- Select Set Up > Apps.
- Click Add App.

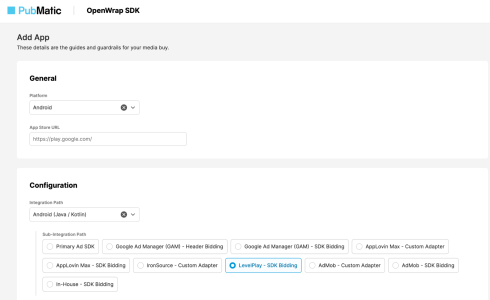
- In the General section:
- Select Android as the platform.
- Enter a valid Google Play URL.
- Review or edit the auto-generated app name
- In the Configuration section:
- Select your Integration Path.
- Set Sub-Integration Path to “LevelPlay – SDK Bidding”.
- In the Advanced section:
- Ensure the currency is set to USD.
- Click Add App.
Create ad units
After adding your app, create individual ad units that LevelPlay will request during bidding.
- Select Set Up > Ad Units.
- Select your app to view its ad units.
- Click Create Ad Unit.
- Enter an ad unit ID.
- Select an ad format and complete any required fields.
- Click Save or Save & Create Another.
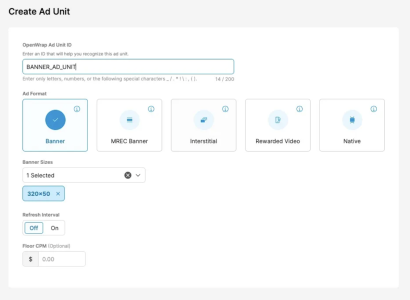
PubMatic generates an ad unit ID, which appears in the Ad Units section.
Manage bidder partners
Review which bidder partners have access to your ad units.
- Select Set Up > Bidder Partners.
- Select your app.
- Enable or disable ad units for each bidder partner using the toggles.
Step 3: Activate PubMatic in your LevelPlay setup
After configuring your app and ad units in PubMatic, activate the PubMatic network inside LevelPlay to connect your PubMatic credentials to your placements.
- In LevelPlay, open Monetize > Setup > SDK Networks.
- Select Pubmatic from the list of available networks.
- Enter the required parameters, click Activate, then Save.
- Select Pubmatic again from your configured networks and click Setup.
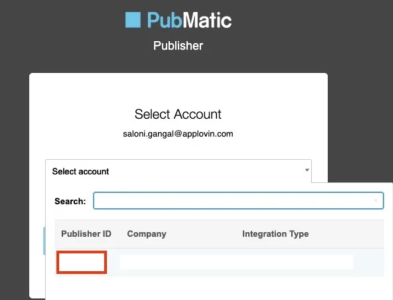
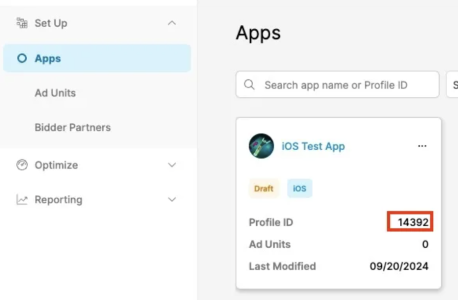
- Enter the following values from your PubMatic dashboard:
- Publisher ID: found in your PubMatic publisher account
- Profile ID: found on the Apps page
- Ad Unit ID: found in the Ad Units section
- Publisher ID: found in your PubMatic publisher account
- Set the status to Active and click Save.
PubMatic now appears as active for mediation on your Setup dashboard.
Step 4: Add the PubMatic adapter to Your Build
To complete the integration, add the Pubmatic SDK and the LevelPlay PubMatic adapter to your Android project.
Gradle
- Make sure the following Maven URL exist in your build.gradle script of your app module.
repositories { mavenCentral() maven { url 'https://repo.pubmatic.com/artifactory/public-repos' } } - Add the adapter’s Maven name to your build.gradle script of your app module.
dependencies {
    implementation 'com.unity3d.ads-mediation:pubmatic-adapter:5.0.0'
    implementation 'com.pubmatic.sdk:openwrap:4.10.0'
}
Manual integration
- Download the latest version of the PubMatic OpenWrap SDK for iOS and link all the .xcframework files and bundles in your project.
- Add the PubMatic Adapter to your build. You can find the latest PubMatic Adapter here.
- Make sure you add the following to your Gradle build file under the dependencies section
dependencies {
    implementation 'com.unity3d.ads-mediation:pubmatic-adapter:5.0.0'
    implementation 'com.pubmatic.sdk:openwrap:4.10.0'
}
Step 5. PubMatic Additional Settings
User-level COPPA
Unity LevelPlay let’s publishers communicate PubMatic User-level COPPA settings directly to the PubMatic network. This feature is enabled using LevelPlay SDK 9.0.0+, PubMatic iOS Adapter 5.0.0+.
Use the following syntax, to set PubMatic COPPA with the parameter True:
LevelPlay.setMetaData("LevelPlay_ChildDirected","true");Use the following syntax, to set PubMatic COPPA with the parameter False:
LevelPlay.setMetaData("LevelPlay_ChildDirected","false");