
Unity Ads integration guide
This guide gives you step-by-step instructions on how to set Unity Ads live as an ad network on Unity LevelPlay.
For the Unity Ads network, the auto-setup tool is available to use once you complete step 1 below. The auto-setup tool will create an app and bidder placement and retrieve placement details from Unity Ads—so you don’t need to switch between the LevelPlay and Unity Ads platforms. Alternatively, you can complete the whole setup manually.
Step 1. Set up Unity Ads
Complete the following steps before setting up Unity Ads:
- Create a Unity ID
- Sign up for Unity Gaming Services. Select Get started for free
Step 2. Create a project on Unity Ads
Follow these steps to create your app on Unity Ads:
Create an app
- On the Unity Monetization Dashboard, select Projects. For more information about navigating the dashboard, see Introduction to the Unity Dashboard
- Select Organization, then Projects
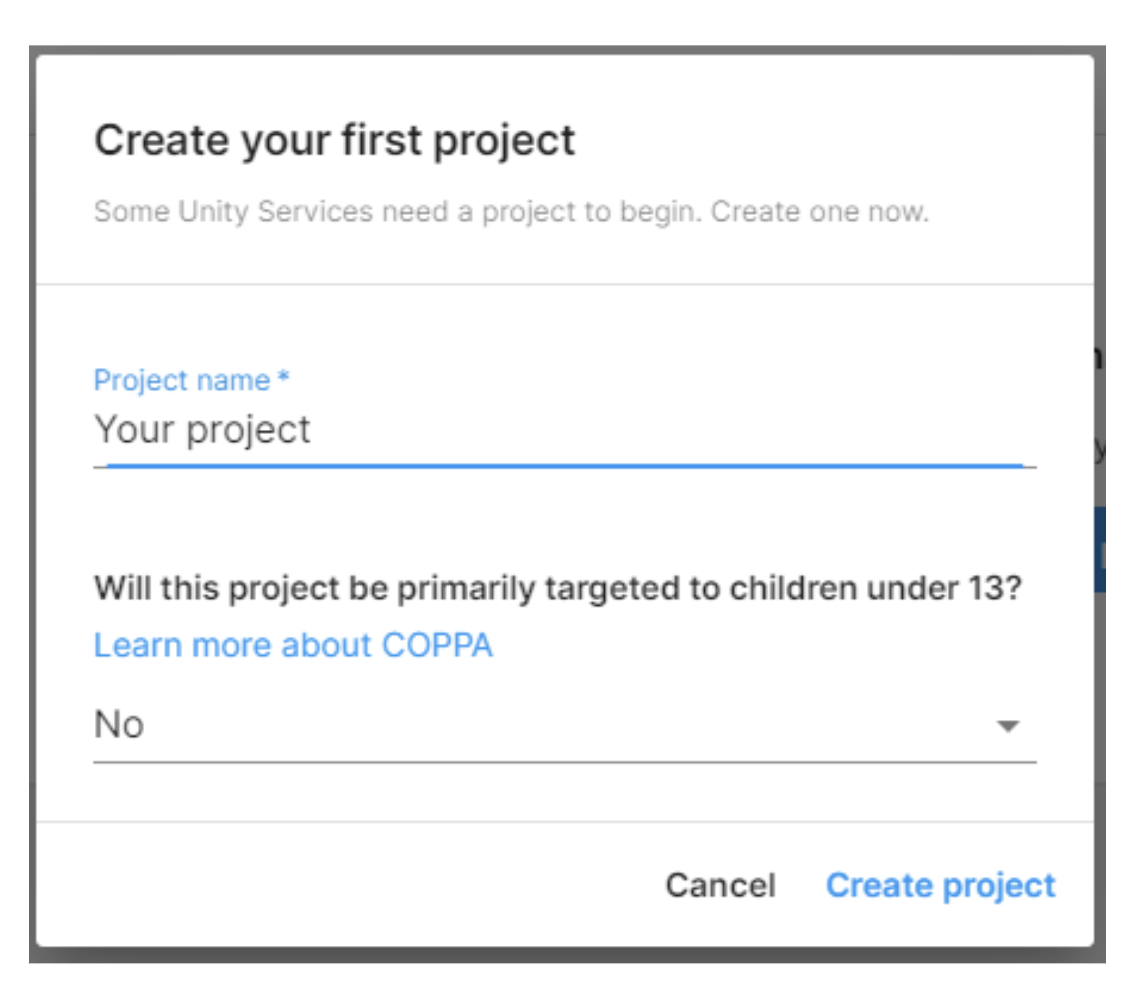
- Click Create project
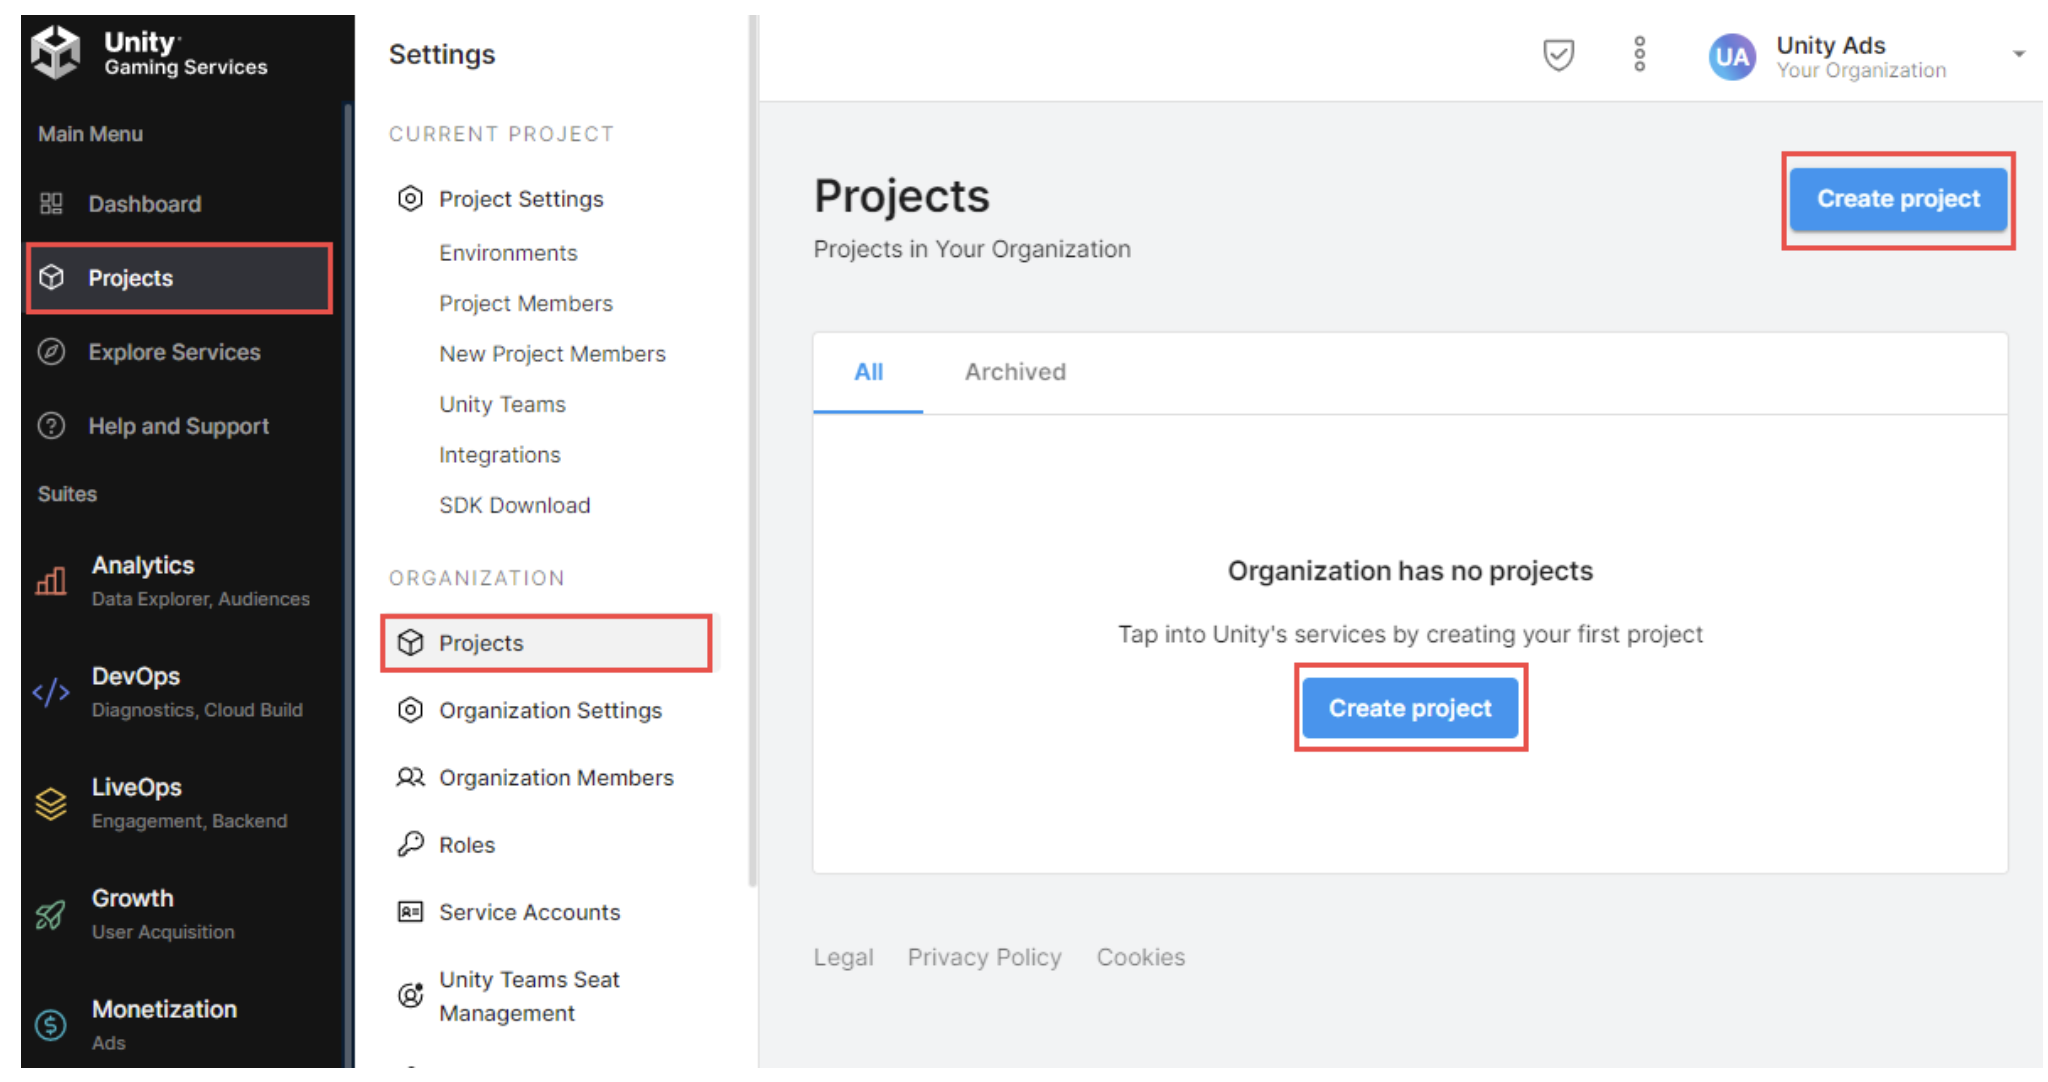
- Enter a project name and COPPA designation
- Select Create project
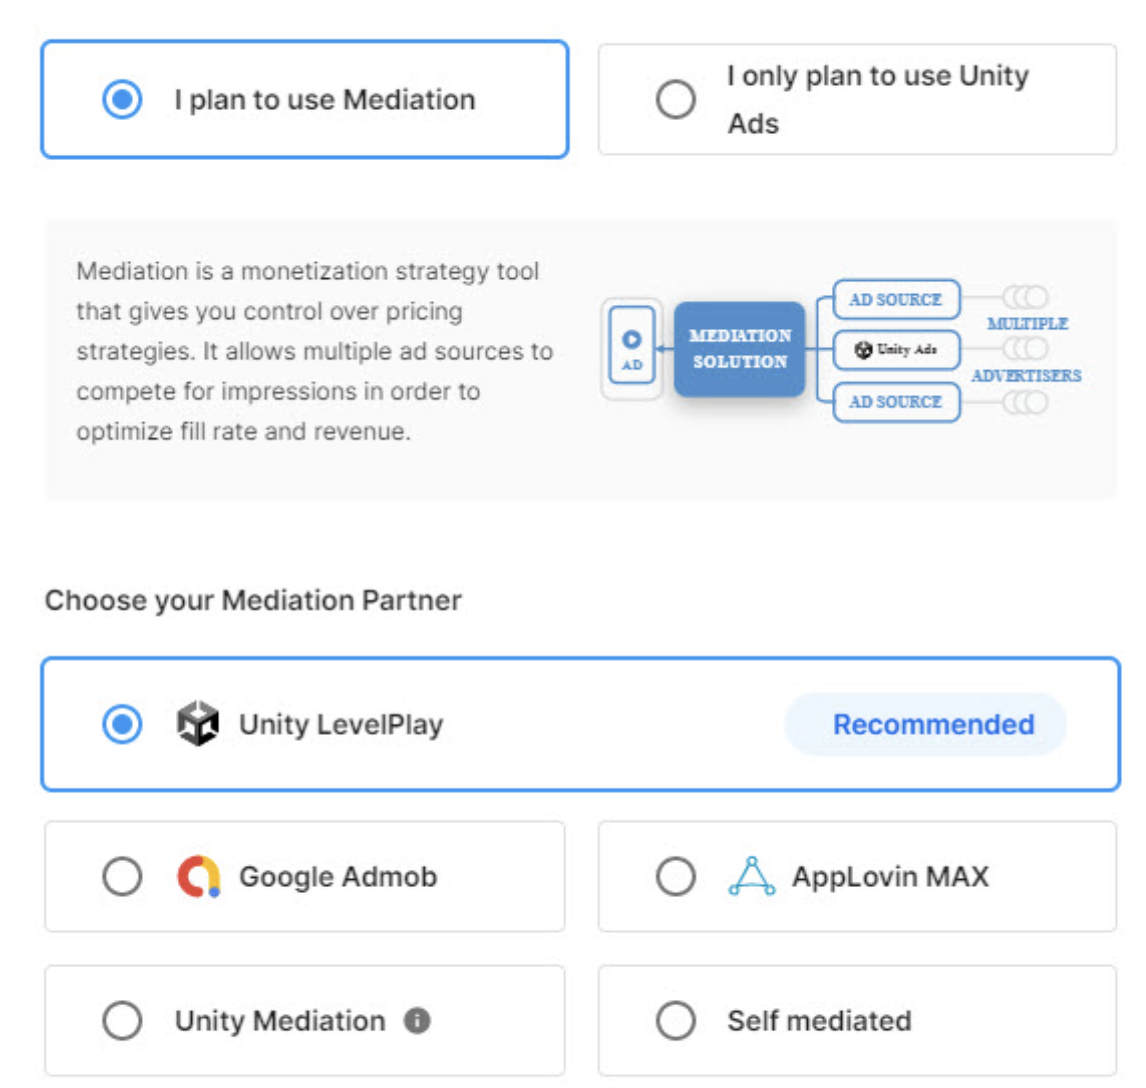
To monetize your project, you’ll need to enable Unity Ads in the dashboard. Select Get started from the Monetization dashboard > secondary navigation menu.
When you initialize Unity Ads for your project, you must select a mediation provider. Select I plan to use Mediation. Then, under Choose your Mediation Partner, select Unity LevelPlay.
Create an ad unit
Use an Ad Unit to surface an event in your game that triggers ad content:
- From the left navigation menu, select Monetization > Ad Units
- Select Add Ad Unit to bring up the creation modal
- Enter an Ad Unit name, then select a platform (iOS or Android) and ad format (Rewarded, Interstitial, or Banner).
- Select Create to save your Ad Unit
Add a placement
Once your project is created, navigate to Monetization > Placements and take note of the Game ID for both platforms.
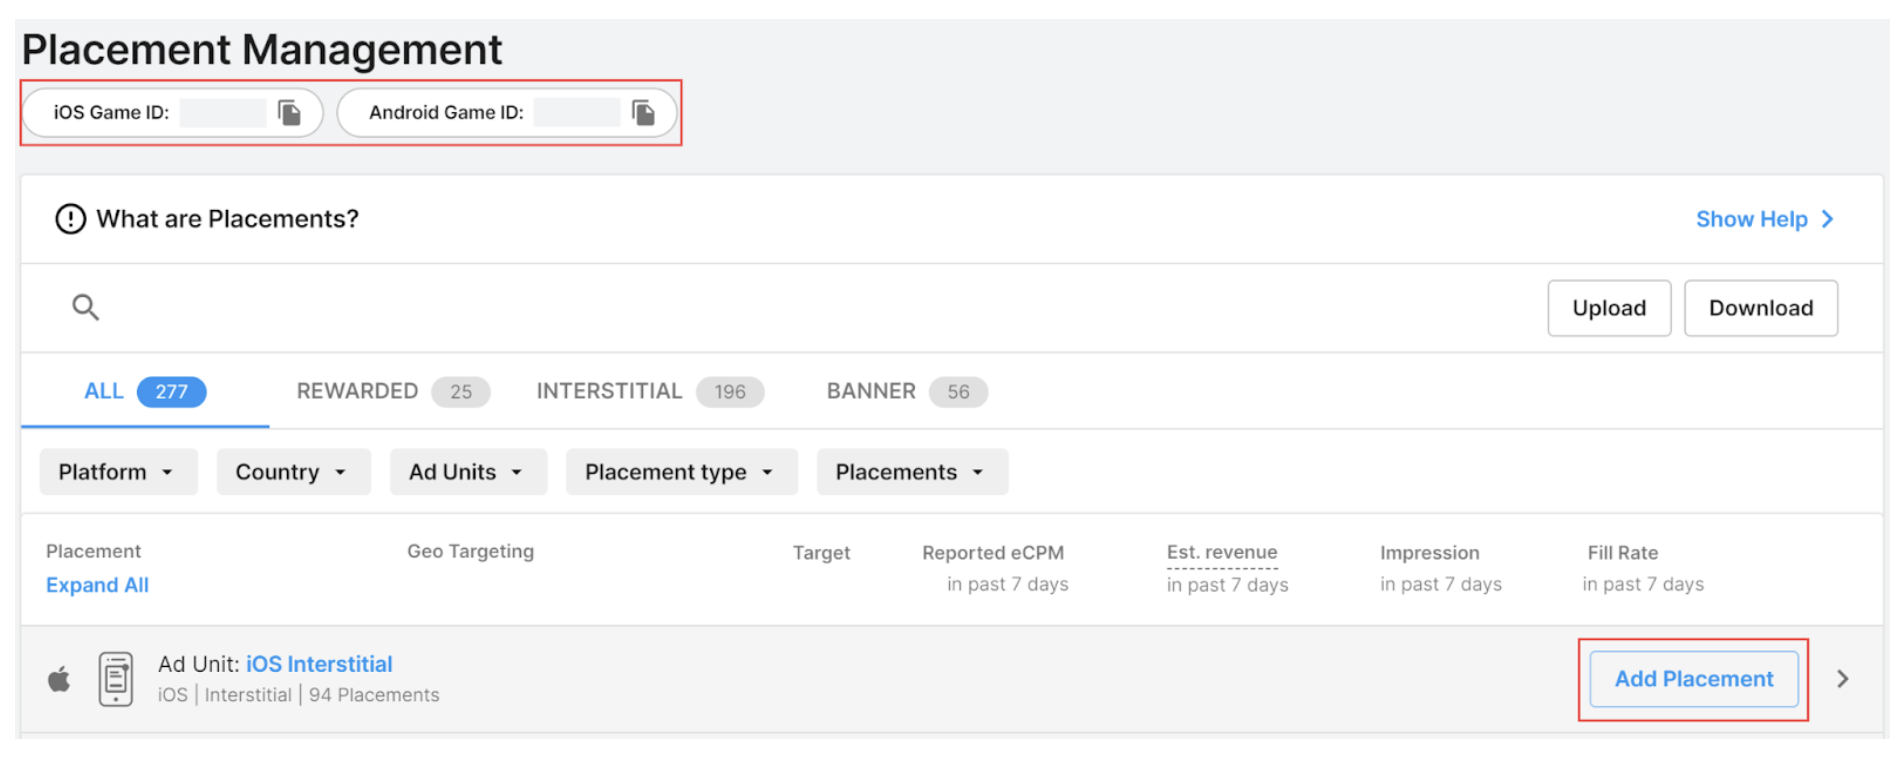
To create a new placement, click the Add Placement button.
Note: While Unity Ads automatically creates “default” placements when first creating your project, we recommend creating new unique placements for each Unity Ads mediation configuration.
Step 3. Retrieve your credentials
You’ll need to retrieve the following details from the Unity Ads platform to complete setup on LevelPlay:
- API Key
- Organization core ID
- Key ID
- Secret key
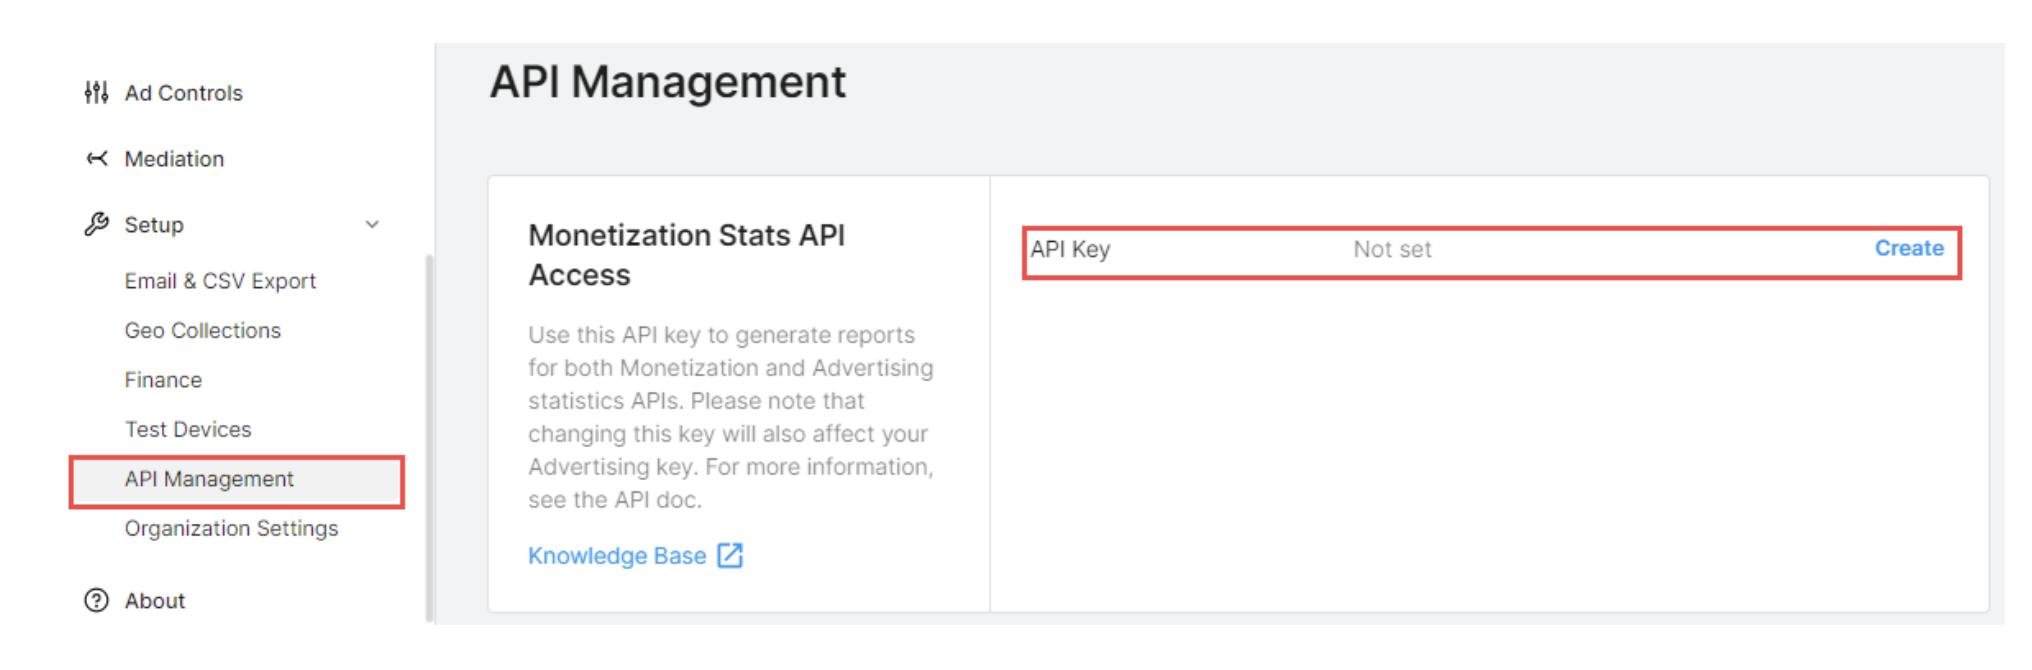
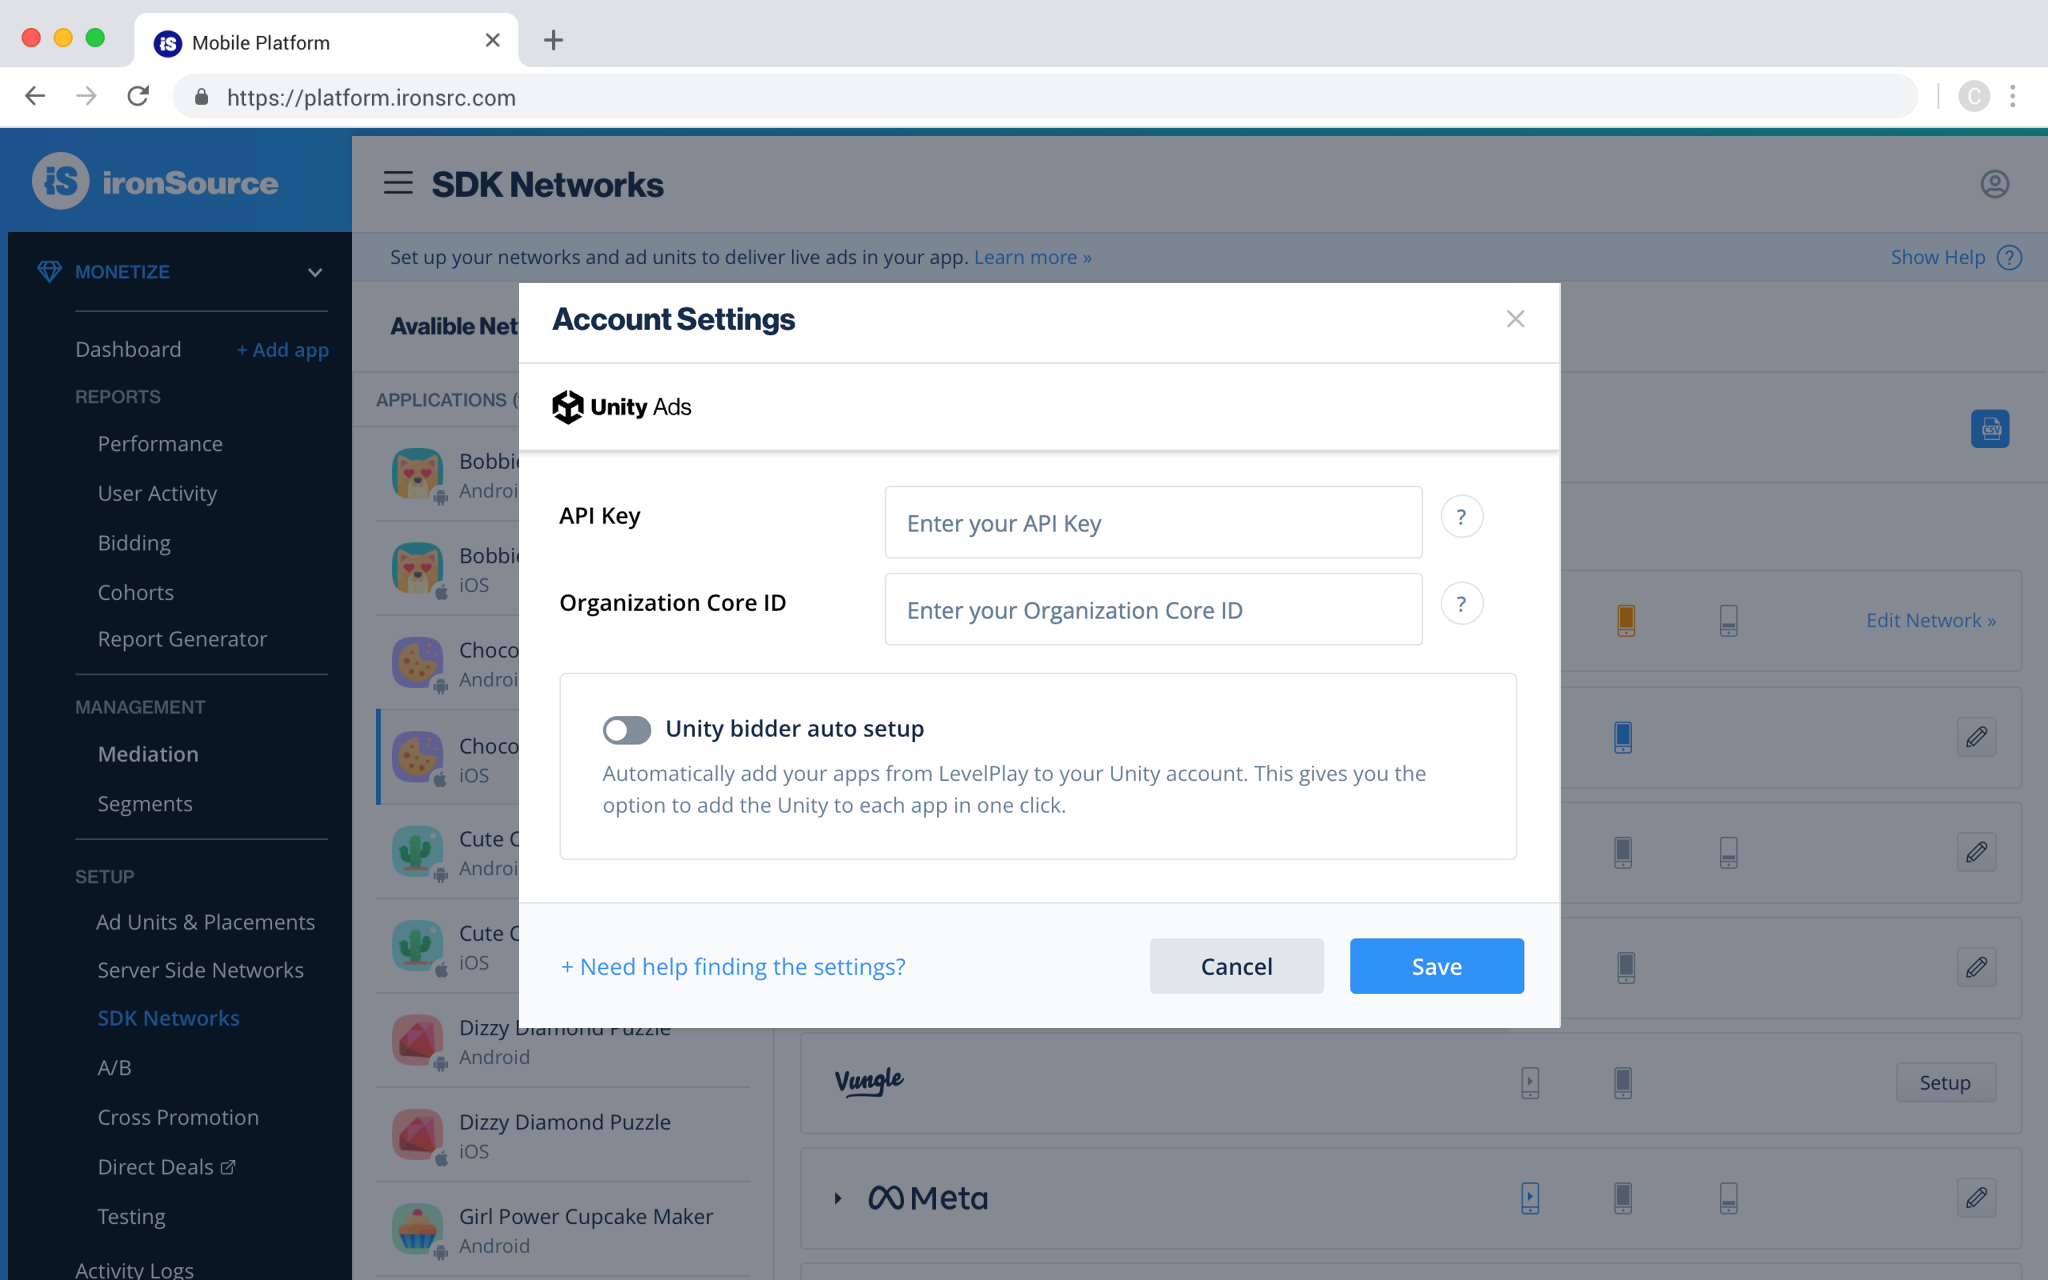
Navigate to Set up > API Management and take note of the API Key.
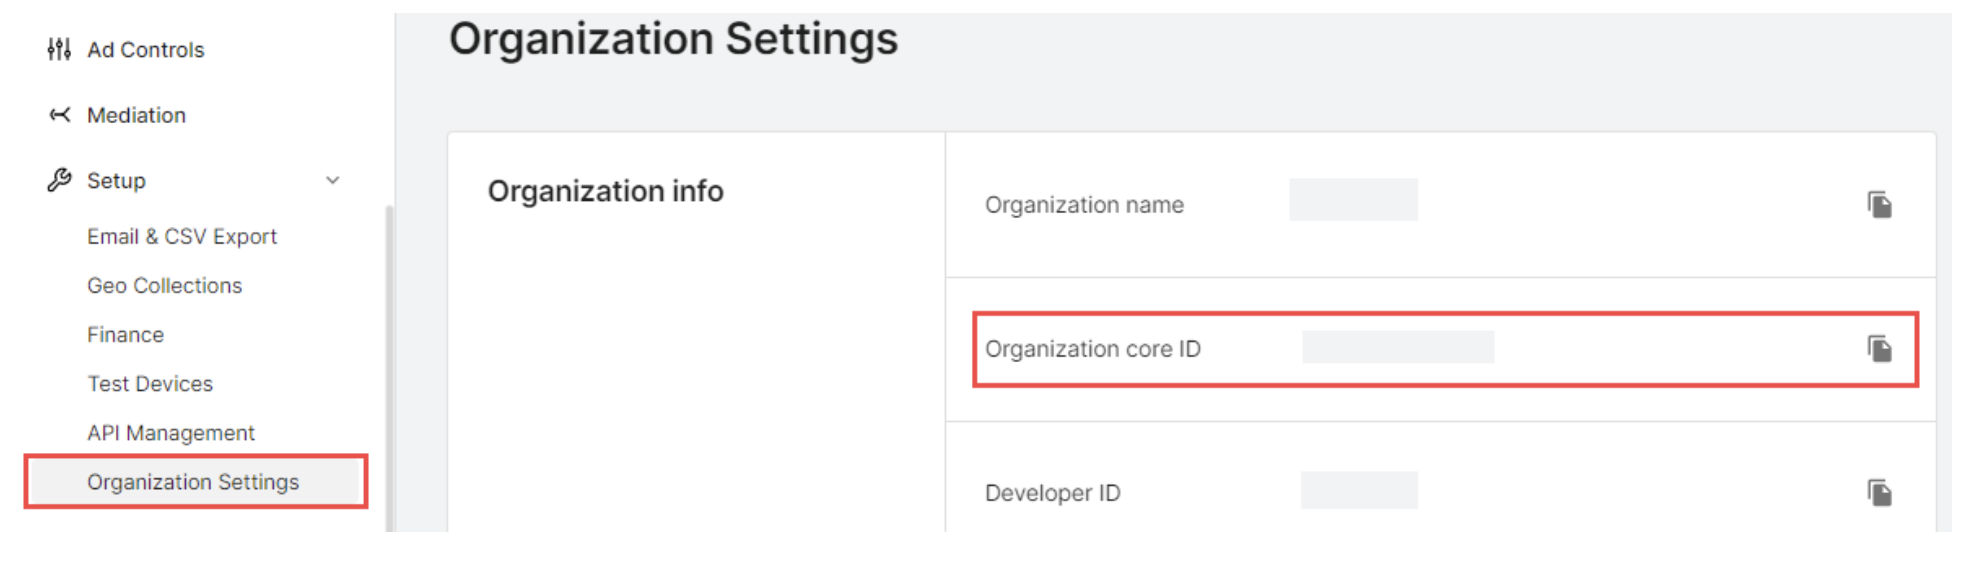
Then, navigate to Organization settings and take note of the Organization core ID.
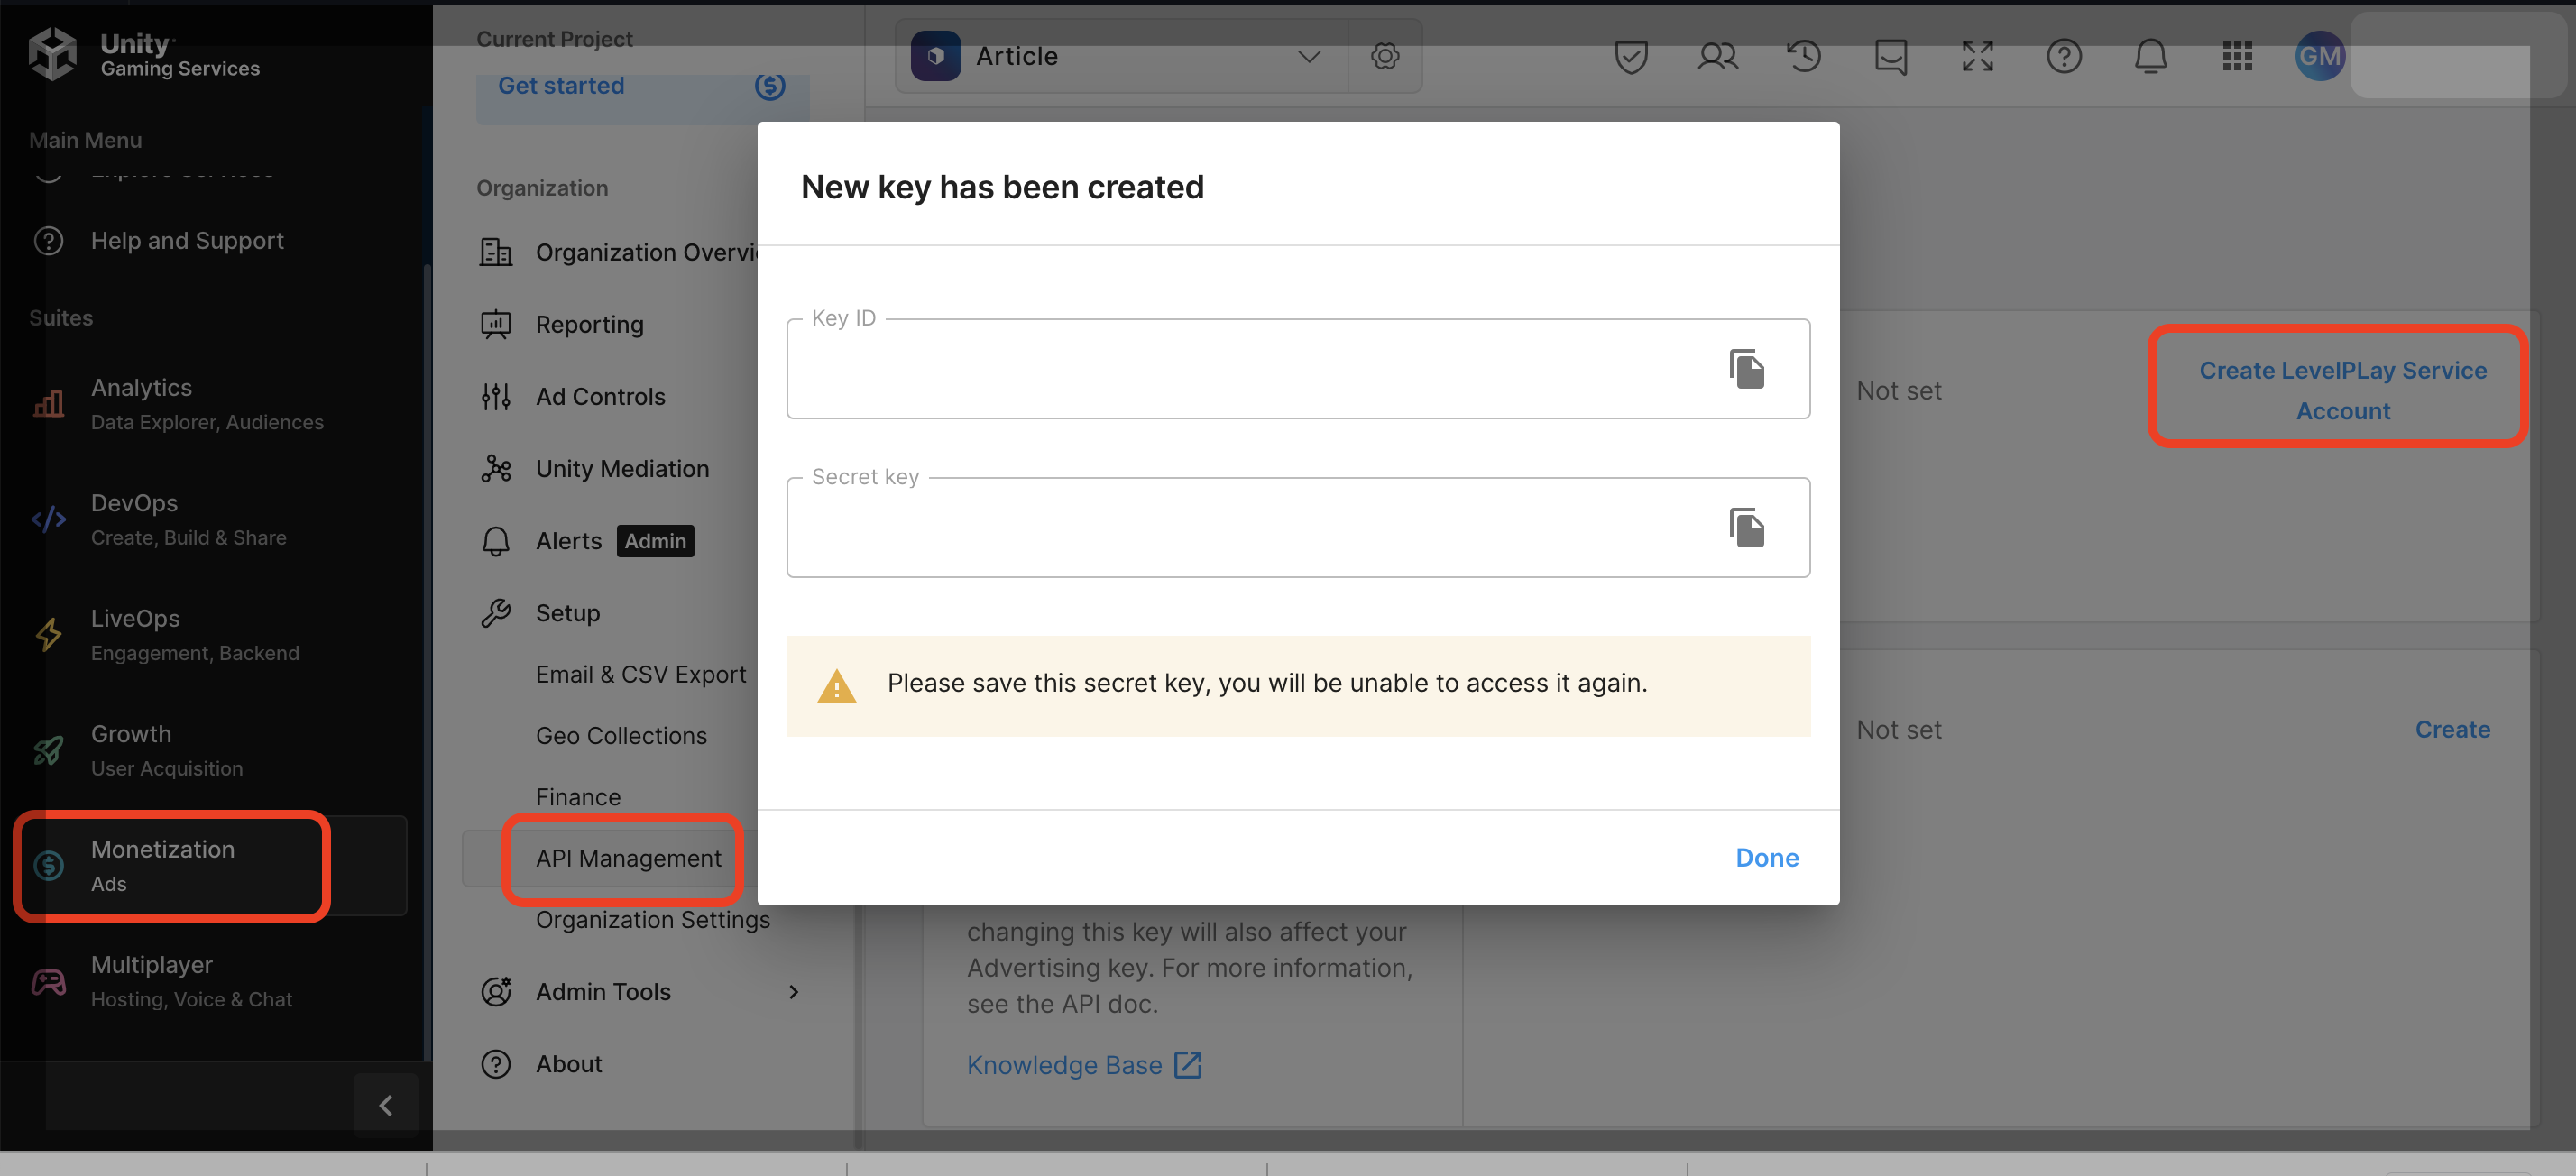
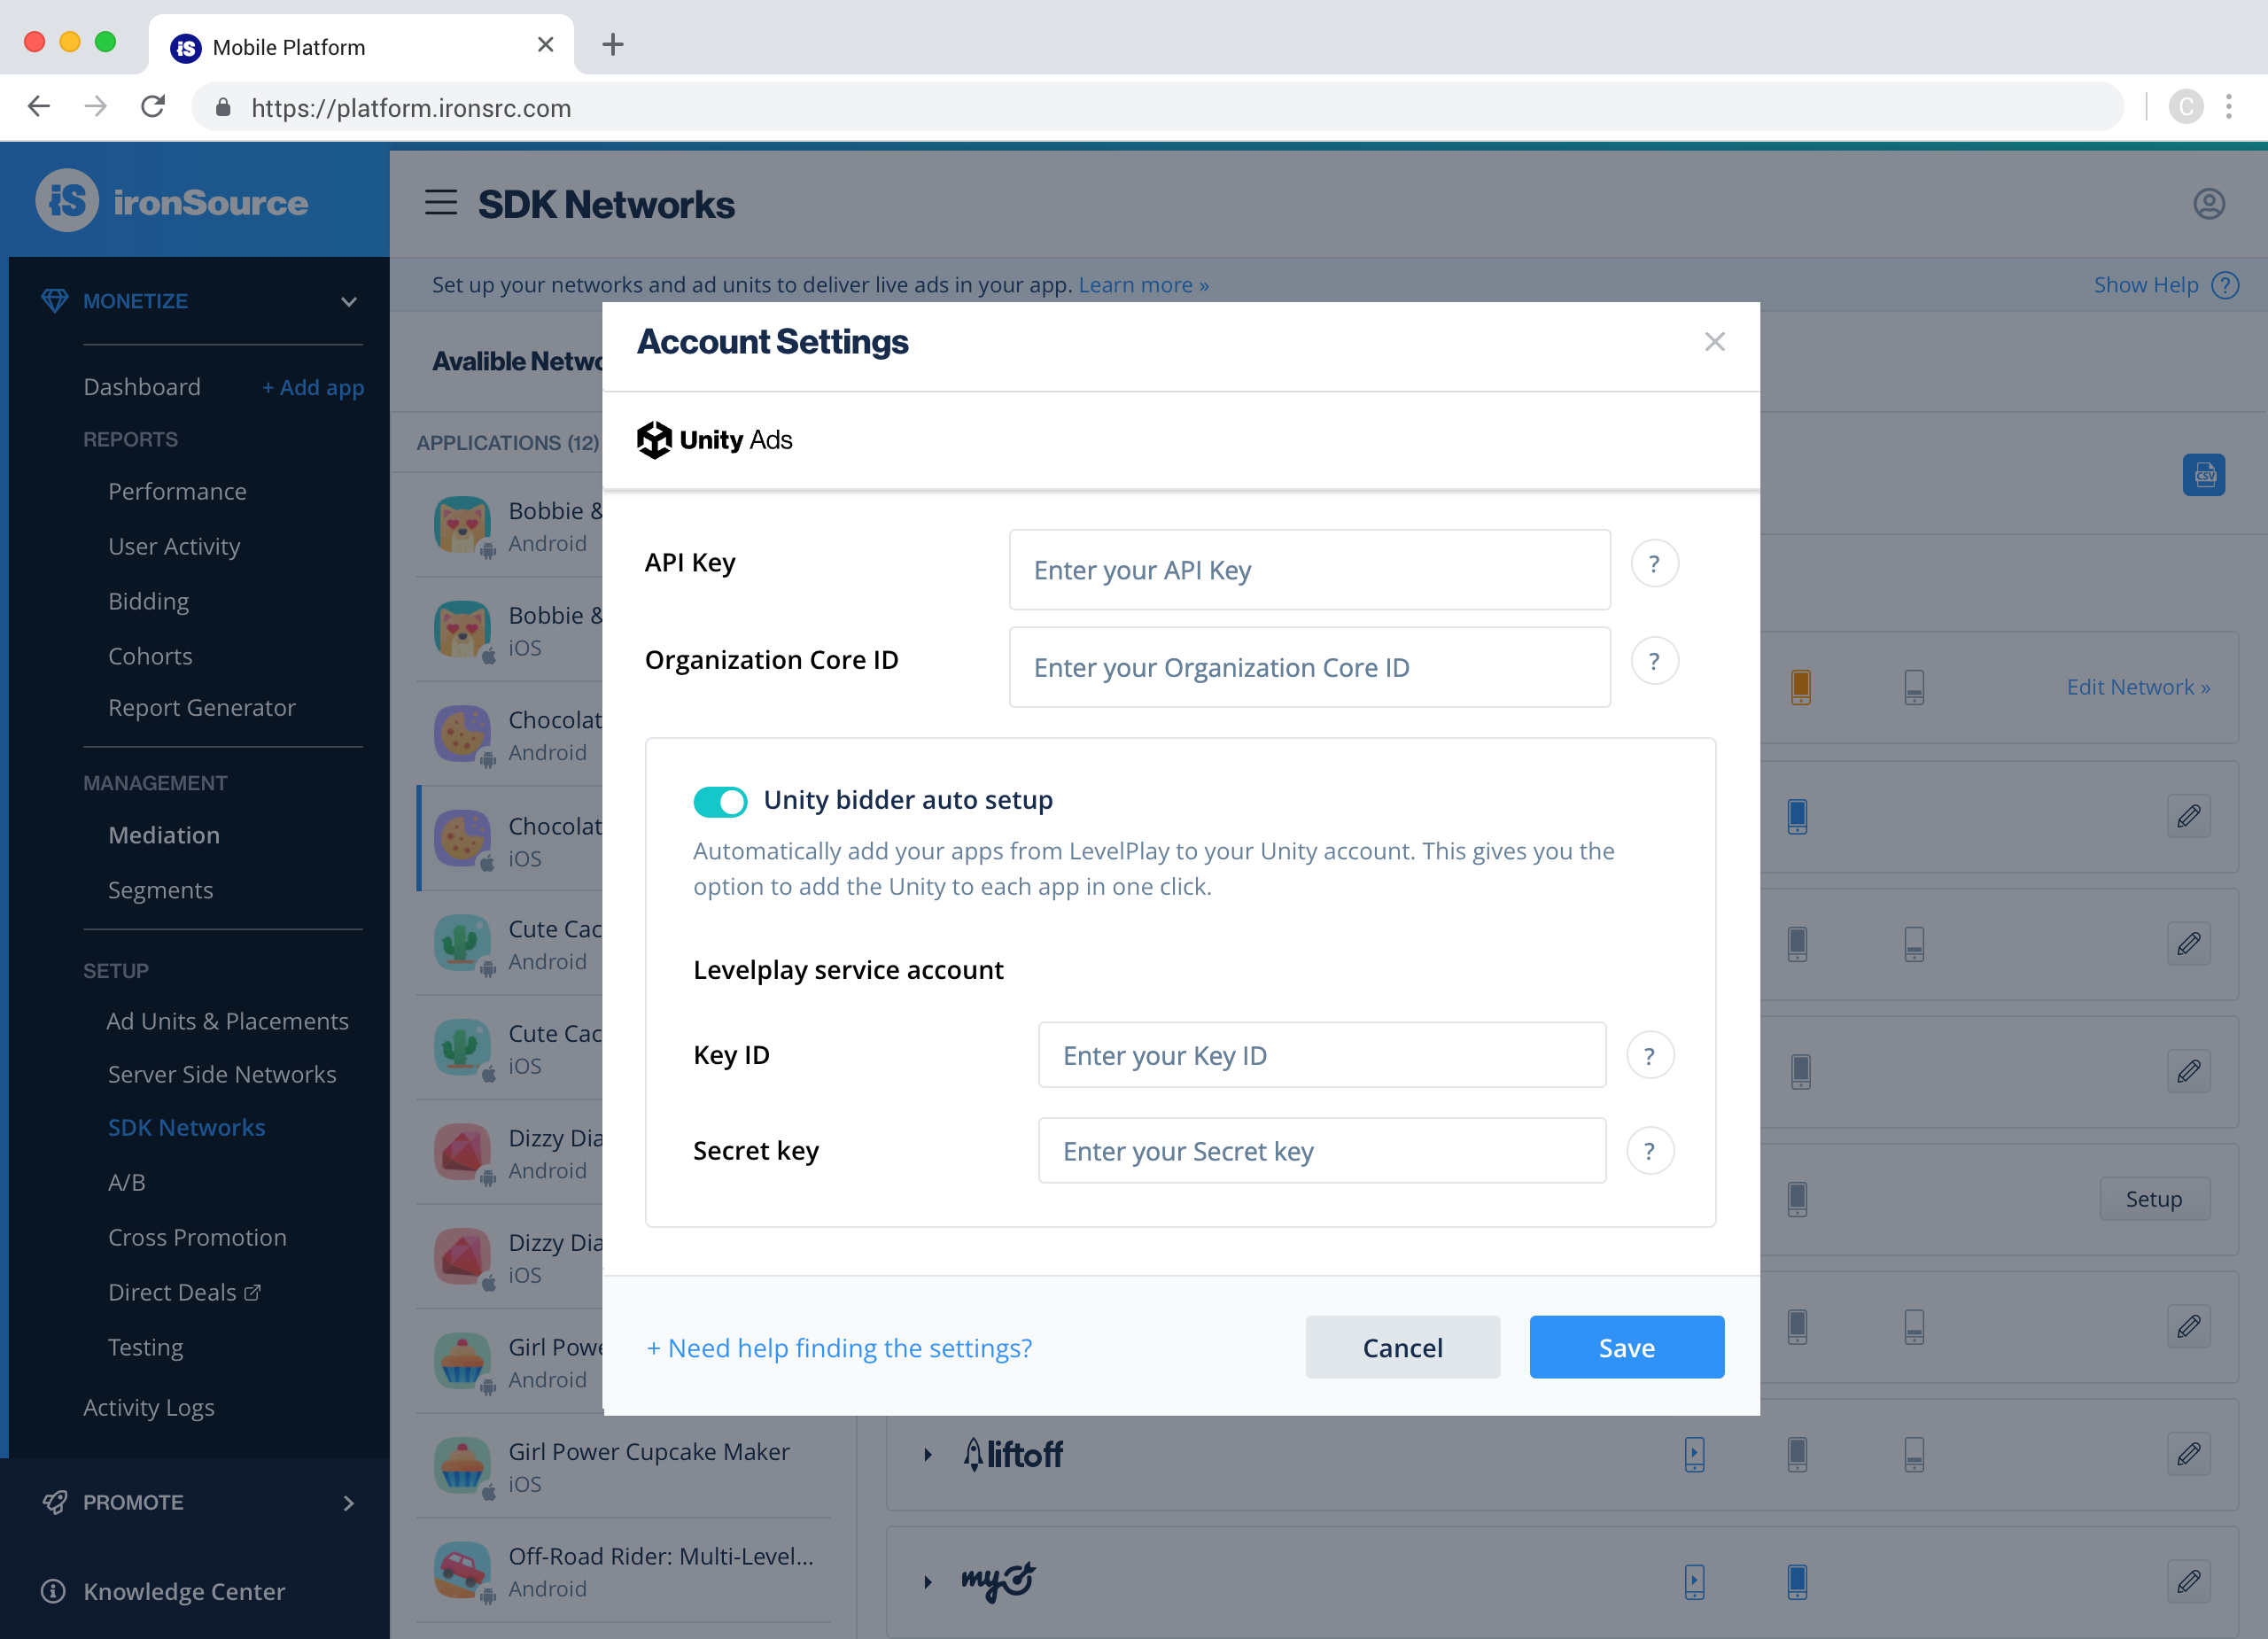
To retrieve your Key ID and Secret key navigate to Monetization, then API Management. Click on the Create LevelPlay Service Account button, and a modal will appear with your key ID and secret key. Make sure to save your secret key, as you won’t be able to retrieve it again once you close the modal.
Step 4. Configure Unity Ads on LevelPlay
Once you have all of these parameters, log in to your LevelPlay account.
- Go to ‘Mediation‘ ➣ ‘Setup‘ ➣ ‘SDK Networks‘.
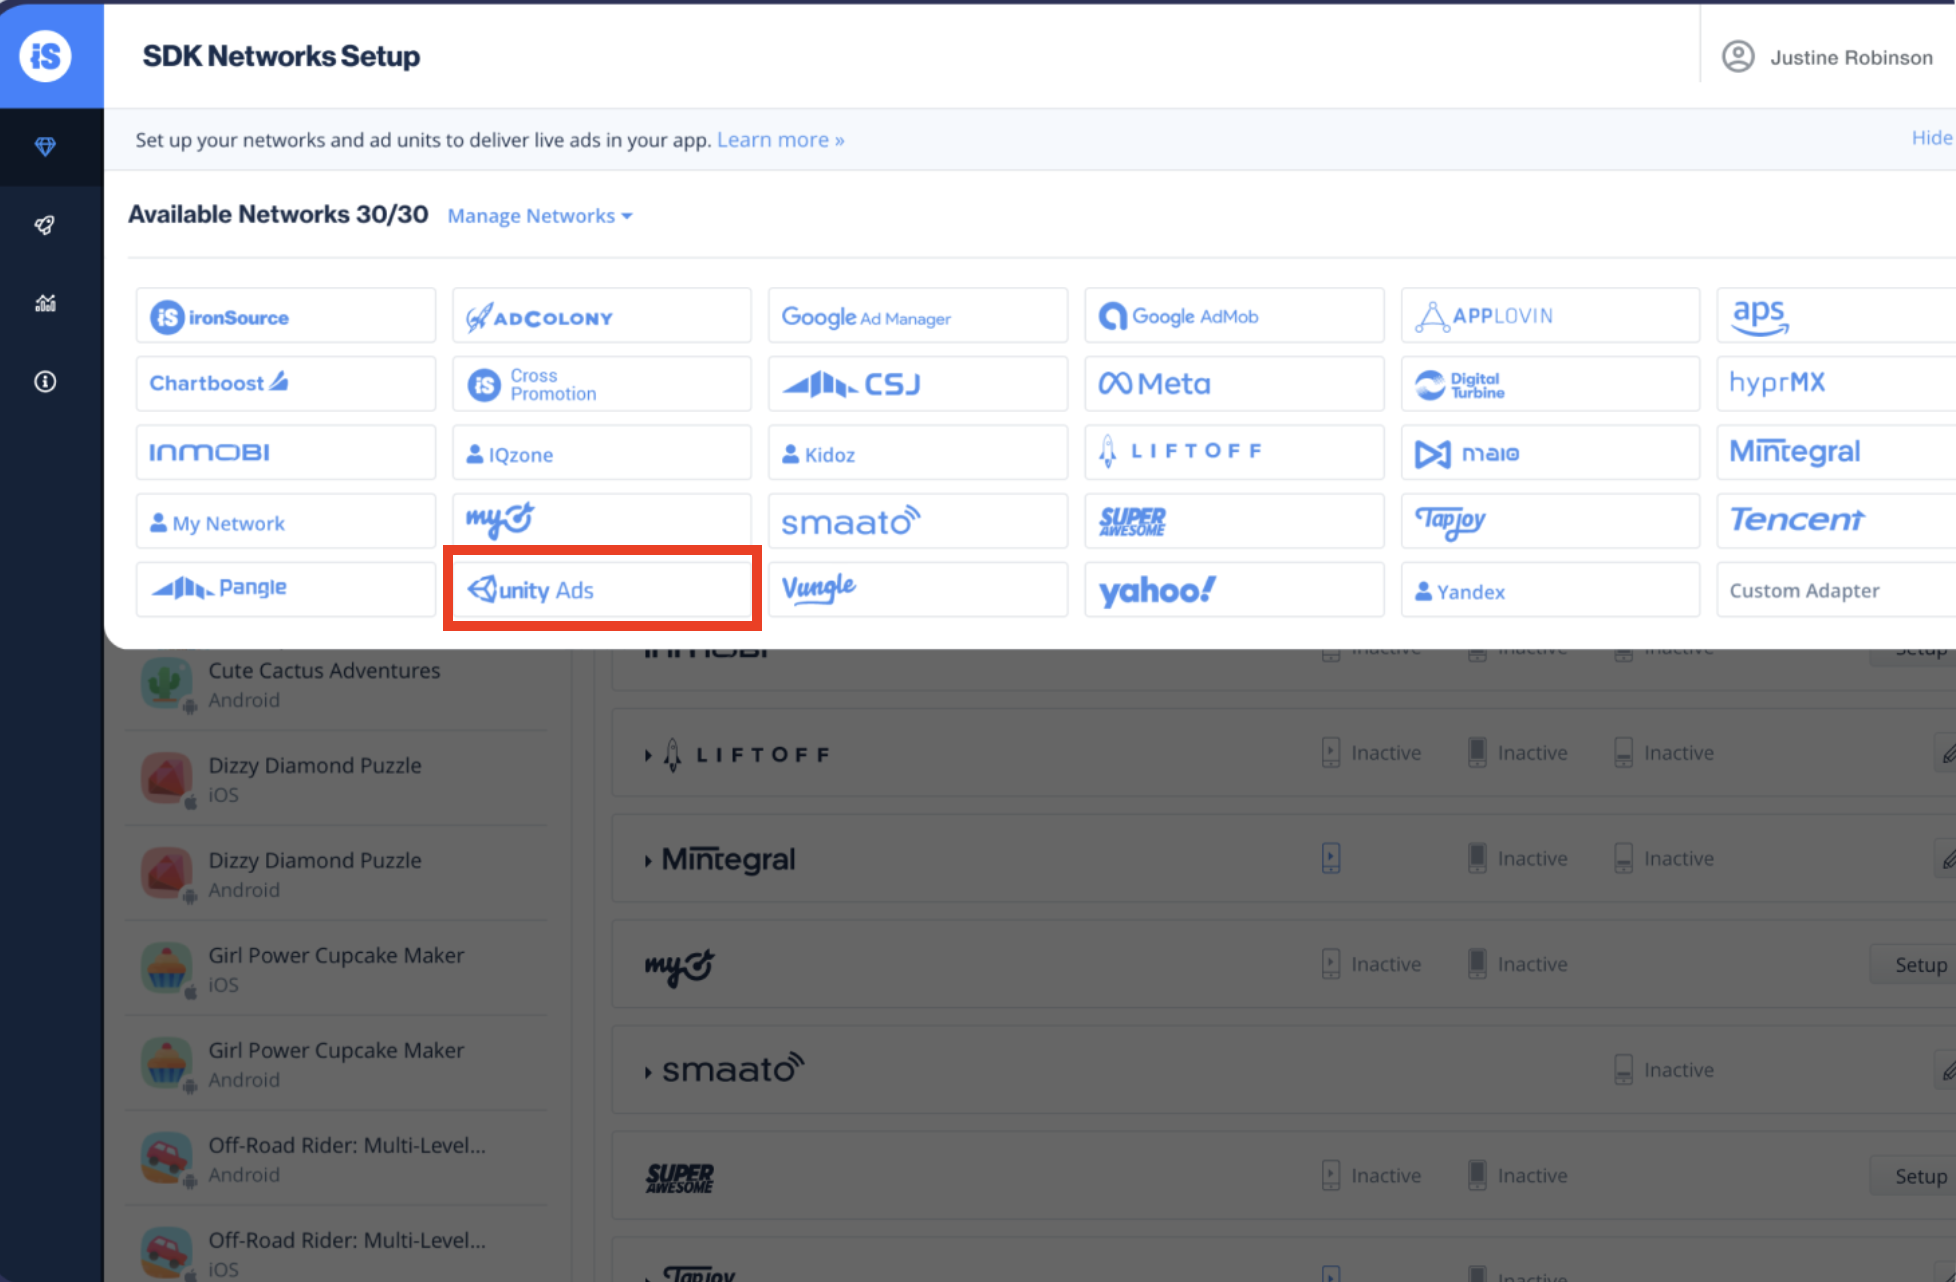
- Select Unity Ads from the list of Available Networks
- Input the Unity Ads API Key and Organizational Core ID in the relevant fields
- To activate the auto-setup feature, toggle on the Unity Ads auto-setup tool. This will enable you to automatically create an app and bidder placement on the Unity Ads platform and allow LevelPlay to retrieve placement details from Unity Ads
- Once you’ve toggled on the auto-setup tool, enter the key ID and secret key (from step 3). Then, click Save
Note: If you toggle the auto-setup tool on, you can still configure Unity Ads bidding manually on LevelPlay
Step 5: Set up Unity Ads on the app level
Traditional waterfall setup
- Choose the app you want to integrate from the list on the left side of the SDK Networks page
- In the ad unit row, click Setup and enter the Game ID and Placement ID under the relevant ad unit settings
- You will then see Unity Ads as Active for Mediation on your Setup Dashboard.
Bidder setup
There are two ways to set up the Unity Ads bidder on LevelPlay:
- Auto-setup – Automatically create a new app and placements on the Unity Monetize dashboard and populate all the necessary settings on LevelPlay
- Manual – Manually enter the necessary app details on the LevelPlay and Unity Ads platforms
Auto-setup
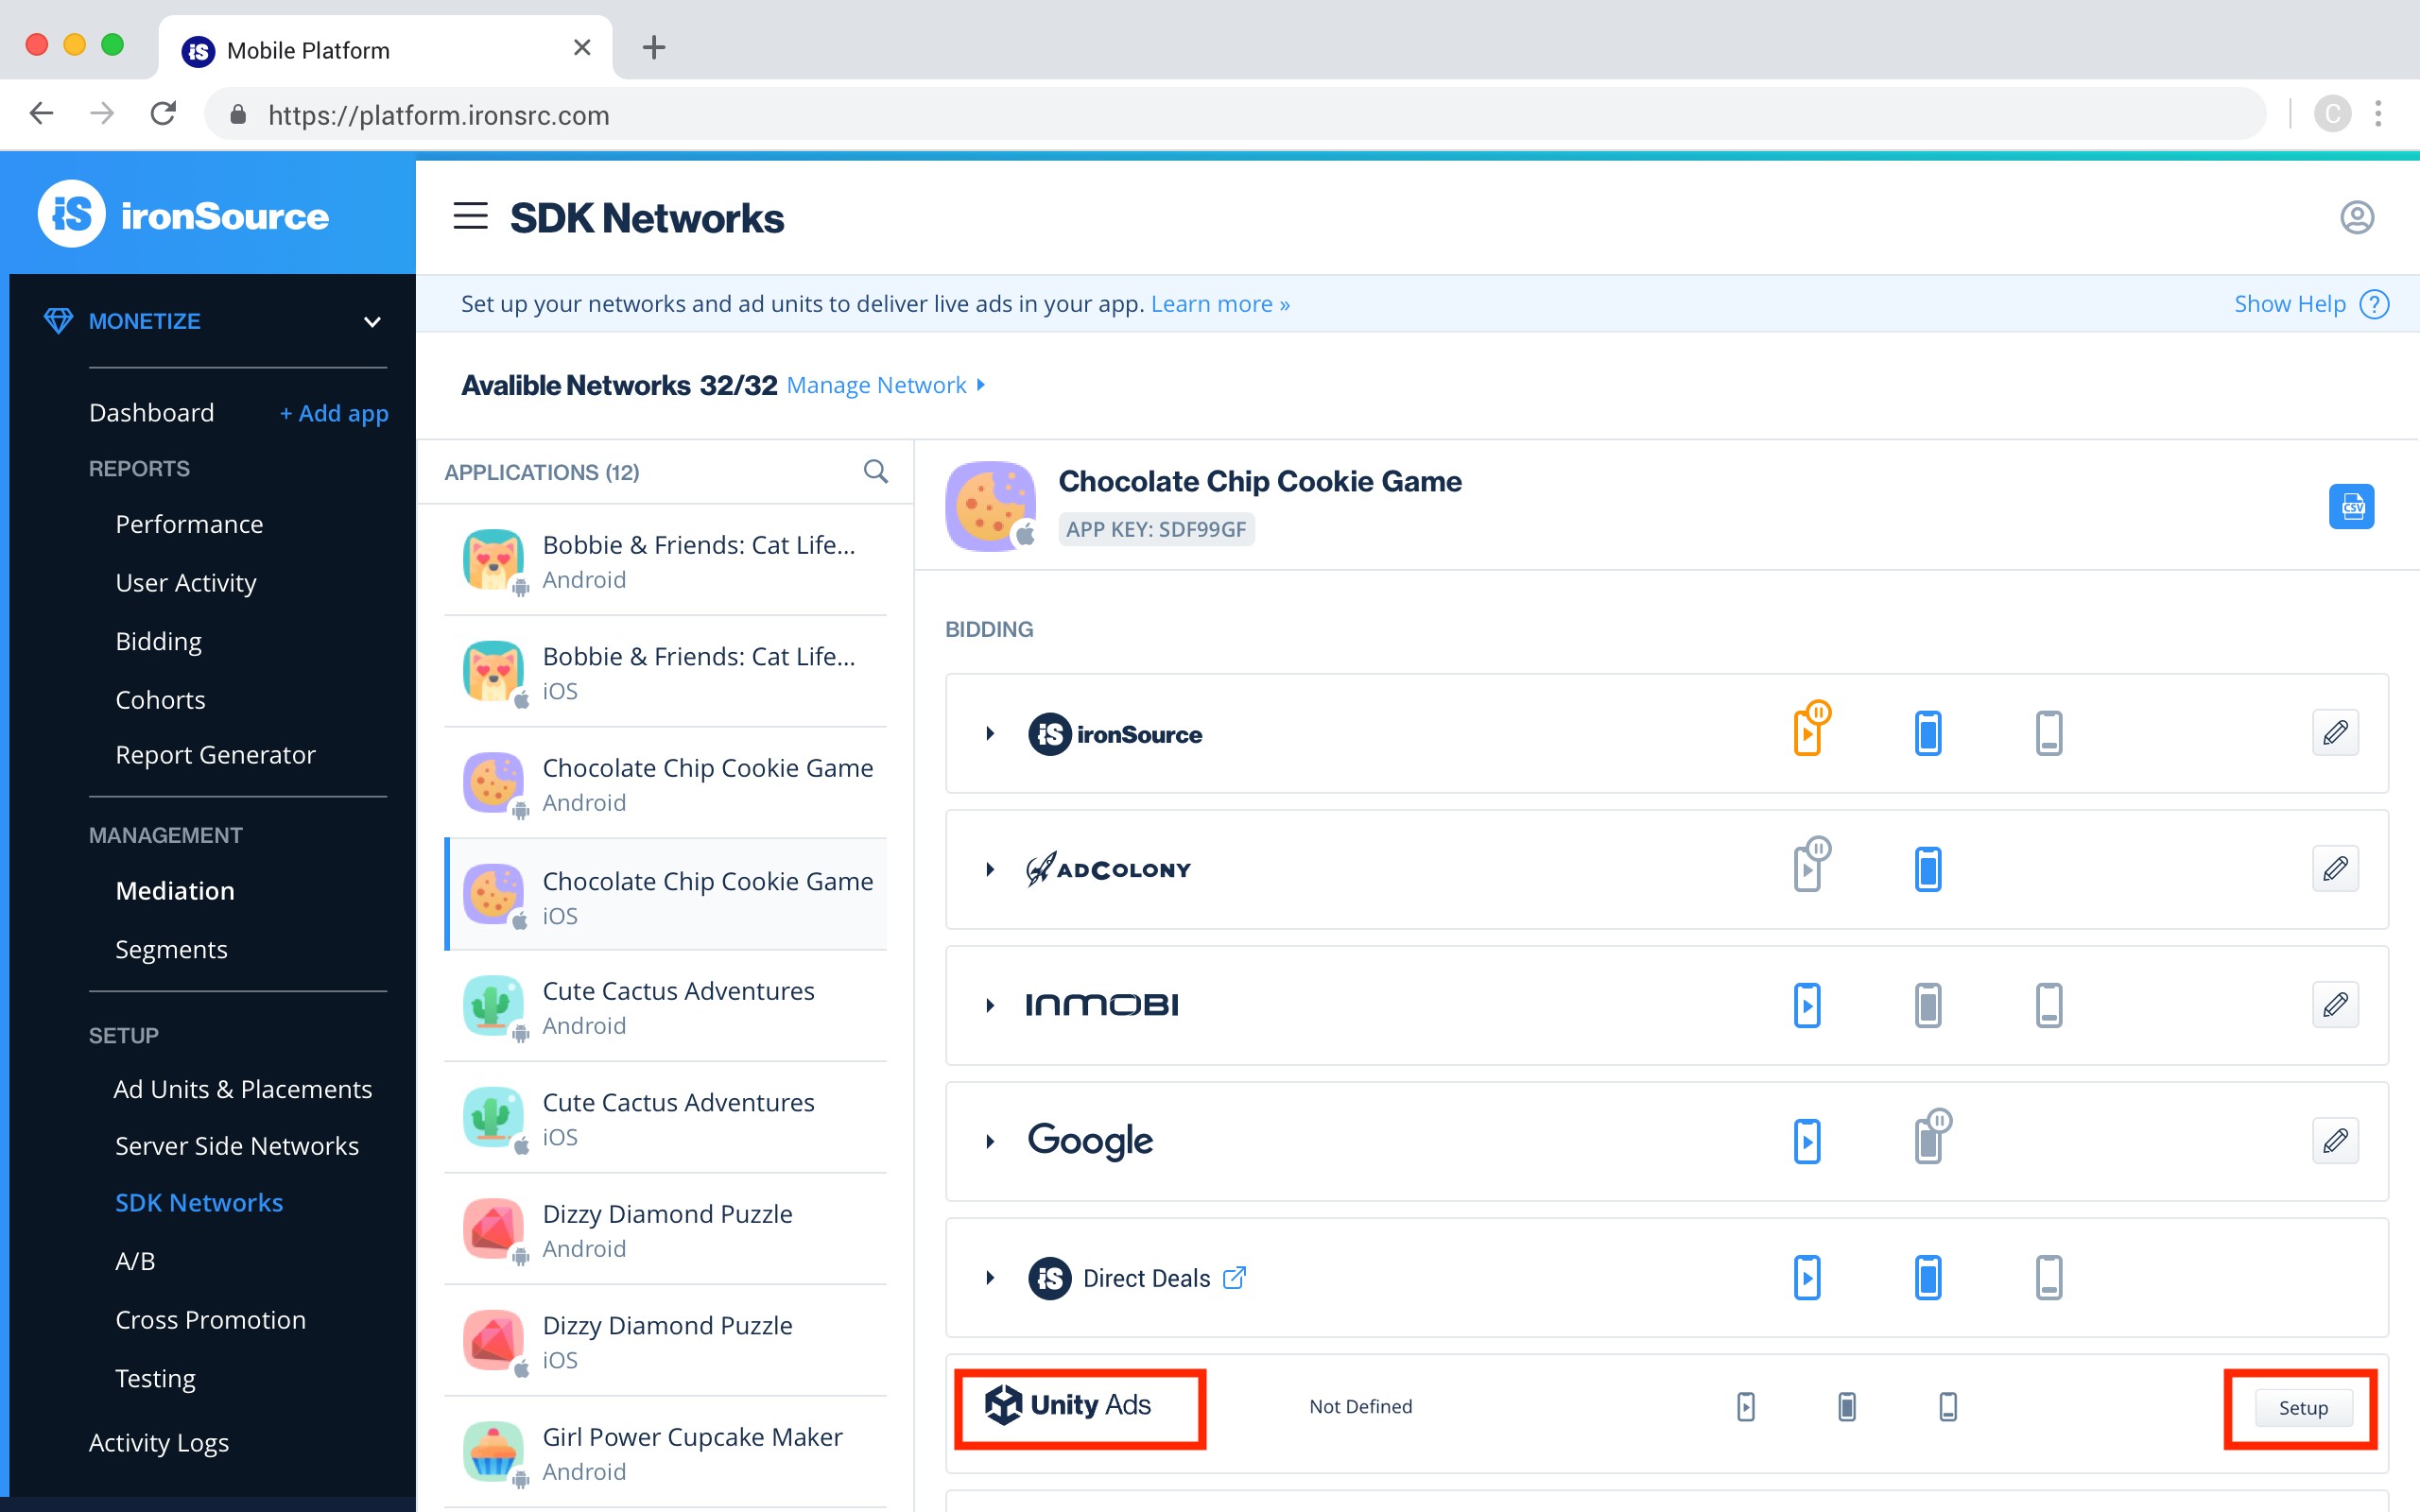
- Select the app where you’d like to run interstitial, rewarded video, or banner ads from Unity Ads. Then click the define icon in the Unity Ads row
- Click the Add bidder button to automatically create new app and bidding placements on the Unity Ads platform, and import the Game ID and Placement IDs. If there is a Game ID already attached to the app, you will be able to use the auto-setup tool if there is at least 1 placement without the Placement ID parameter value. In this case, a new bidding placement will be created (for the Game ID insert)
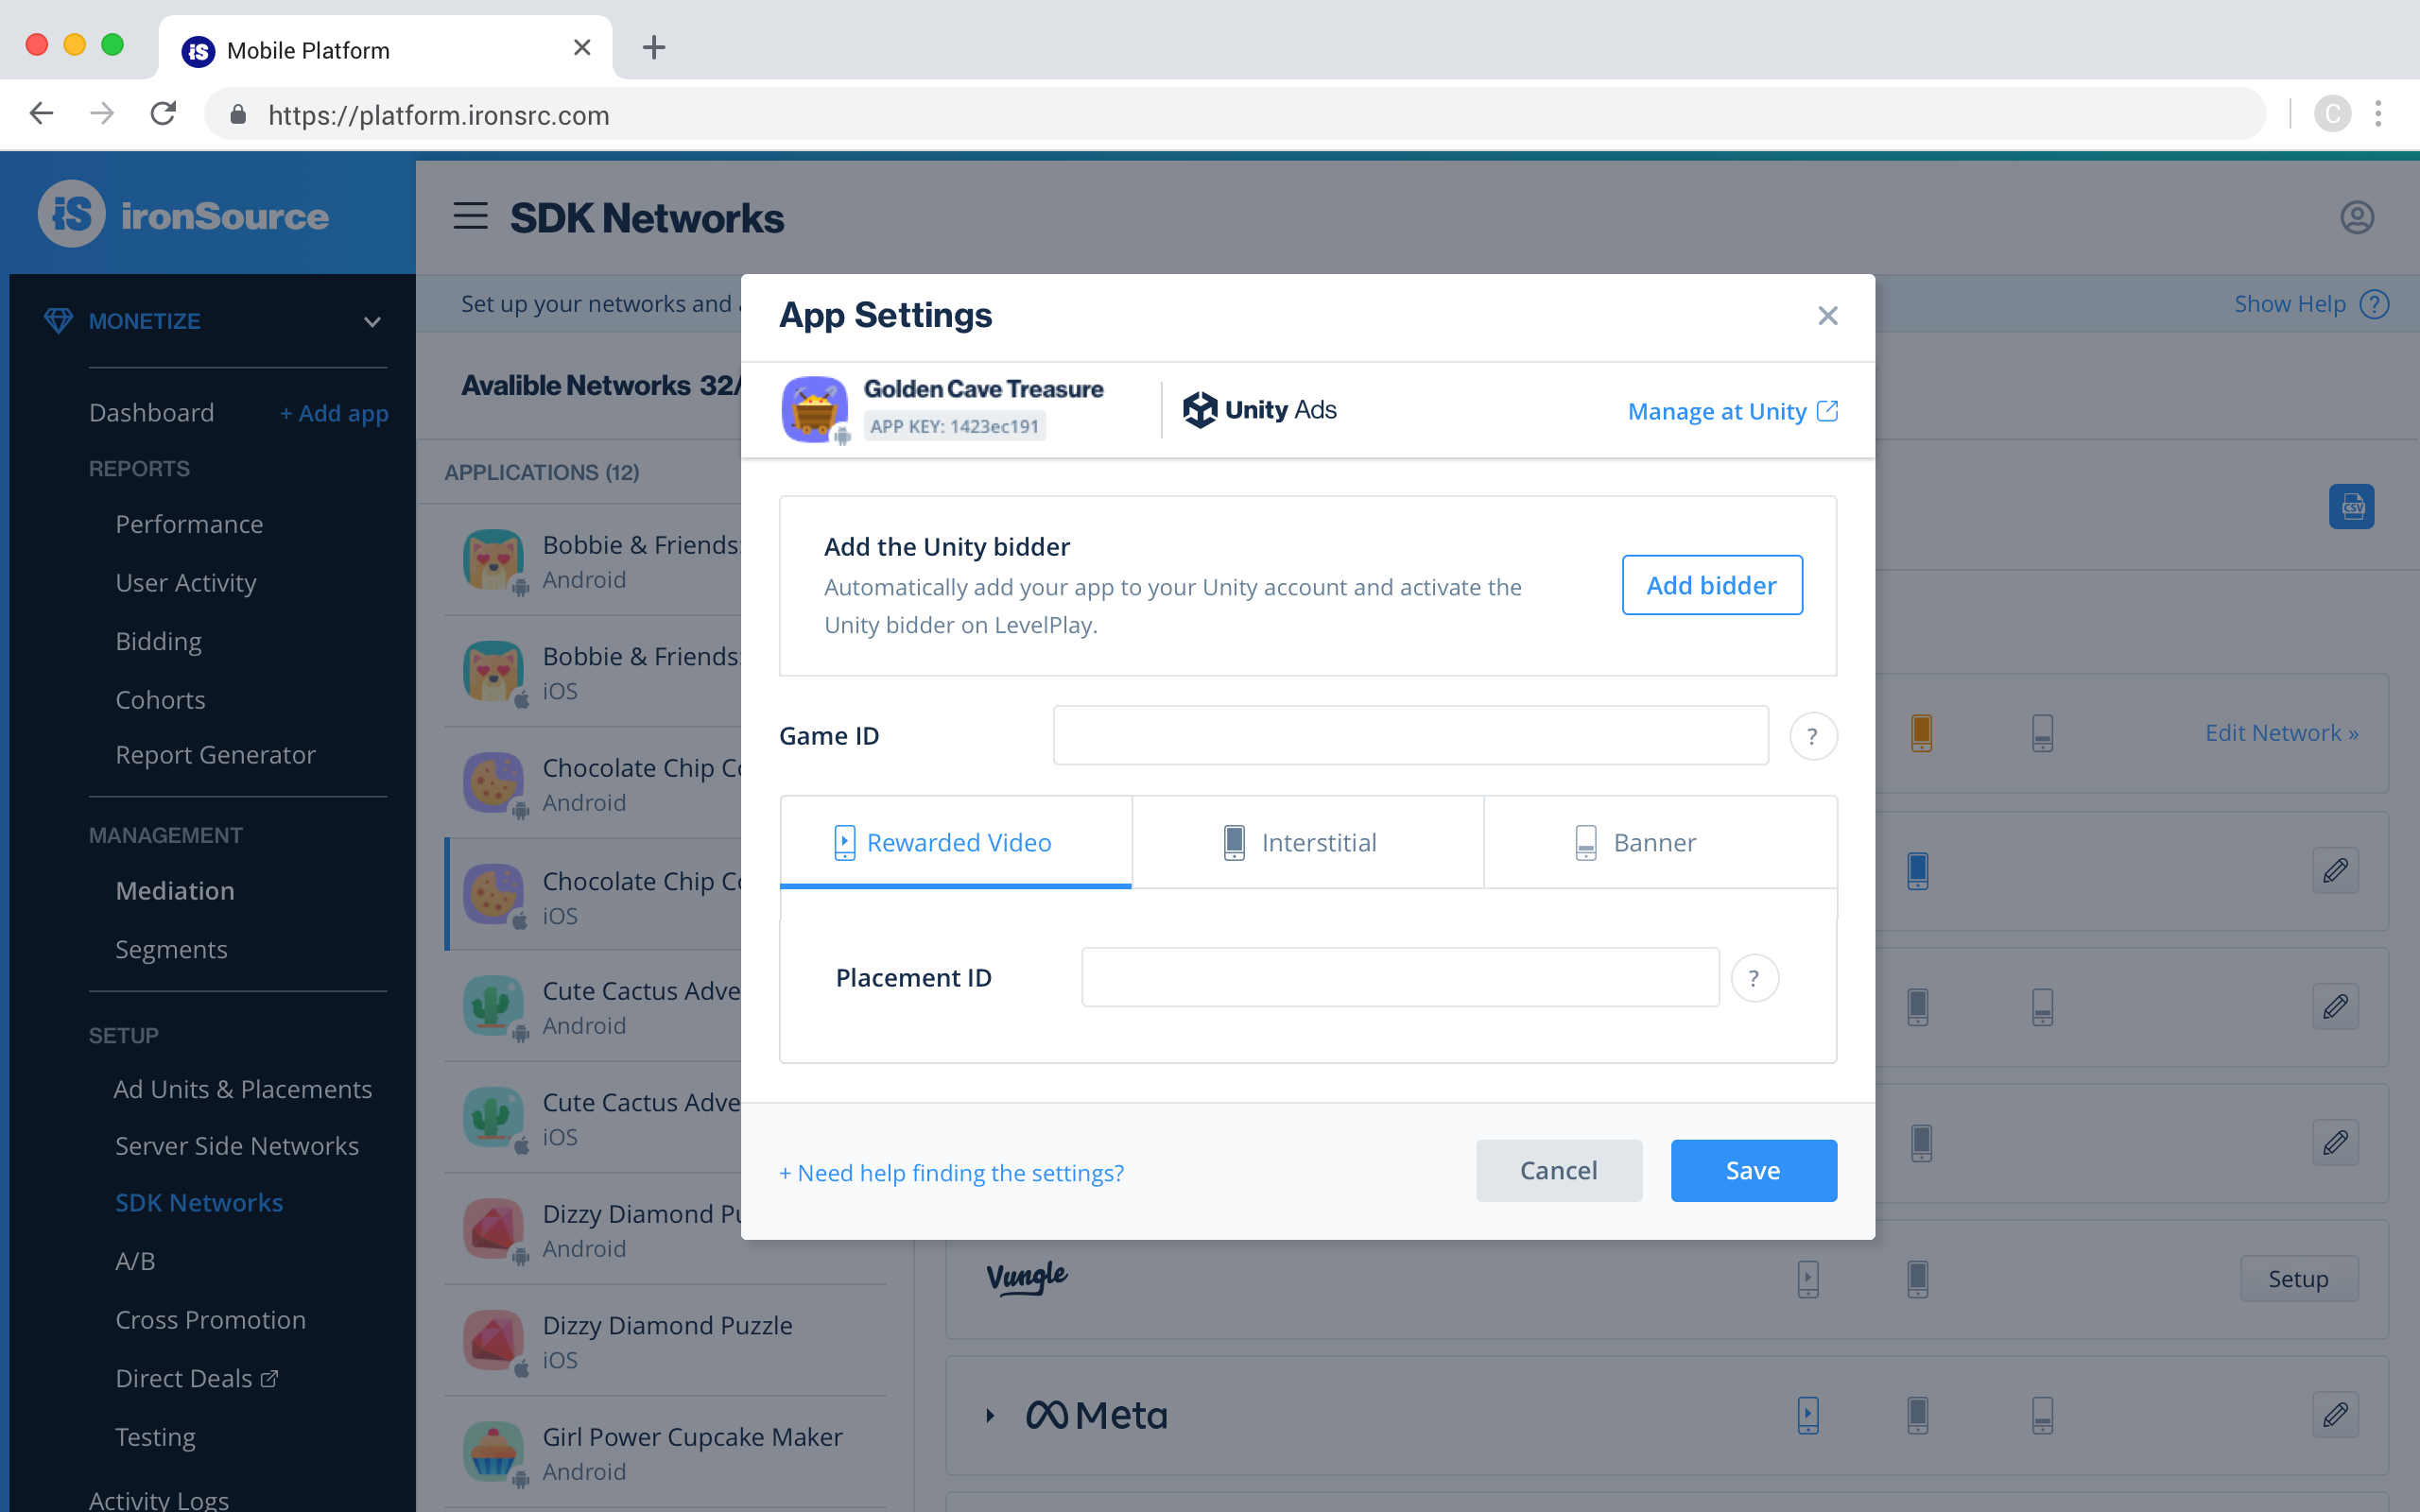
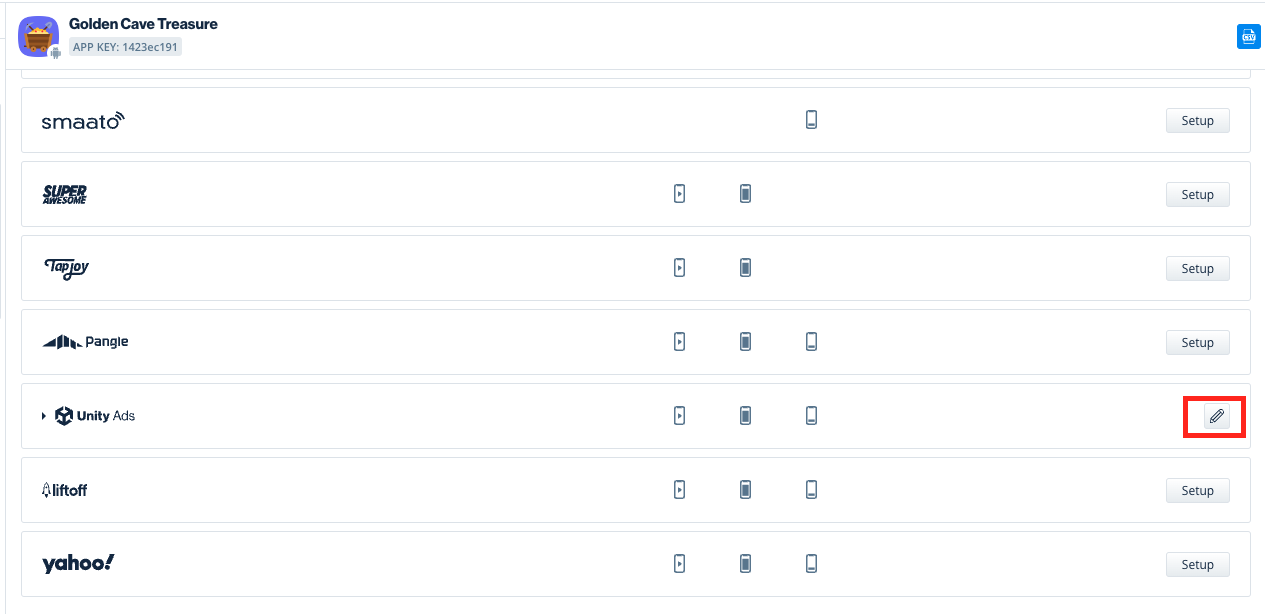
Click Save to approve and accept all configurations. If you close the module without saving, the assets will be created on the Unity Ads platform without importing the data onto the LevelPlay platform.
Important: The status of Unity Ads bidder instances will be the same as the status of the ironSource Ads bidder, by ad unit. For example, if you’re not using the ironSource Ads bidder for rewarded videos, it will not be automatically activated for the Unity Ads network. To activate the Unity Ads bidding instance for rewarded videos, click on the Unity Ads row and toggle on the ad unit.
Manual setup
- Select the app where you’d like to run interstitial or rewarded video ads from Unity Ads
- Select Unity Ads from the Setup list of Ad Networks, click on the define icon, and insert the Game ID and Placement ID in the relevant fields
- Click Save
Now you’ll see Unity Ads as active for the ad units of choice in your account.
Step 6. Add the Unity Ads Adapter to Your Build
ironSource supports both Cocoapods and Manual download mechanisms.Download the Unity Ads Adapter with Cocoapods
To integrate the Unity Ads SDK with Cocoapods, enter the following line in your podfile and you’re good to go!
pod 'IronSourceUnityAdsAdapter','4.3.41.1'
Manual Download
- Download the Unity Ads Adapter and SDK:
Add the Unity Ads Adapter to your build. You can find the latest Unity Ads Adapter and SDK here.
Important! The Unity Ads Adapter does not contain the Unity Ads SDK. Make sure to add Unity Ads SDK as well. - Add the Unity Ads frameworks to your Project:
After you download the SDK and Adapter files and unzip them, drop the framework files into your Xcode Project.
Update Property List file (Info.plist)
Unity Ads SDK 3.4.8+ requires to include Unity Ads ad network ID in your app property list file (Info.plist).
Learn more about Unity Ads SKAdNetwork Ids documentation here.
Step 7. Unity Ads Additional Settings
User-level COPPA
Unity LevelPlay lets publishers communicate Unity Ads User-level COPPA settings directly to the Unity Ads network. This feature is enabled using ironSource SDK 7.1.12+, UnityAds iOS Adapter 4.3.15+.
Use the following syntax, to set UnityAds user.nonBehavioral flag with the parameter True:
[IronSource setMetaDataWithKey:@"UnityAds_coppa" value:@"YES"];
Use the following syntax, to set UnityAds user.nonBehavioral flag with the parameter False:
[IronSource setMetaDataWithKey:@"UnityAds_coppa" value:@"NO"];
- Verify your ad network integration with our Integration Helper. The ironSource SDK provides a tool to ensure you’ve successfully integrated our SDK as well as any additional network adapters.
- Manage the debug logs for your integrated mediation ad networks with this boolean
[IronSource setAdaptersDebug:YES];
When set to YES, this line of code will enable debug logs to help you troubleshoot issues with all of your mediation ad networks. Remove this code before your app goes live with our ad units! Supported for SDK versions 6.5.2 and up.
Done!
You are now all set to deliver Unity Ads ads within your application!
What’s Next?
To leverage additional ad networks through ironSource Mediation, integrate the adapters and follow our integration guides