
Rules and Notifications
A rule is a setting within Notifications that enables you to be informed via email (once daily) about any ads that you deem problematic showing in your app. They’re made up of triggers that you choose (e.g. content rating, title, category etc.).
Example: If you’ve developed a family-friendly game, you can create rules with triggers that will flag ads based on content rating (Adults only 18+, Mature 17+, Teen). When an ad violates this rule, it’ll be flagged and you’ll be notified via email.
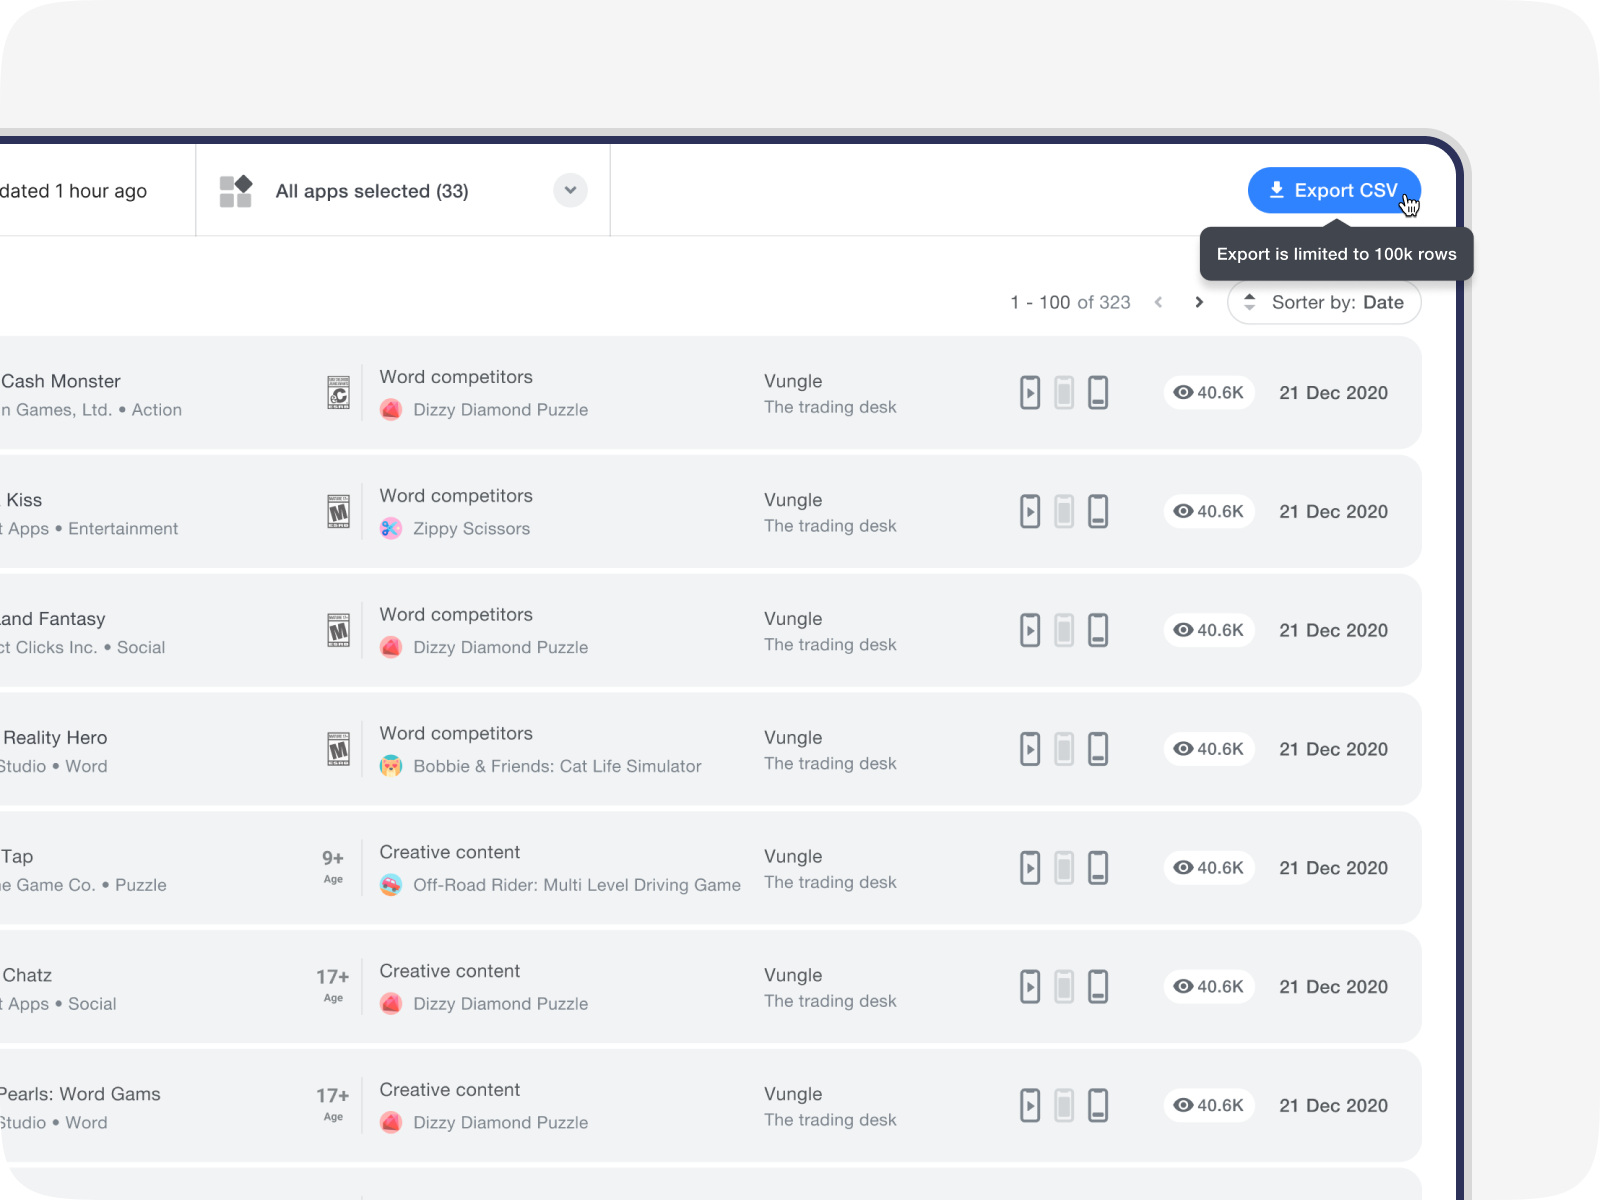
A list of all the creatives that have violated your rules can be found on the Notifications page. Click through to view the creative and essential details so you can report them to the relevant networks.
Create a rule
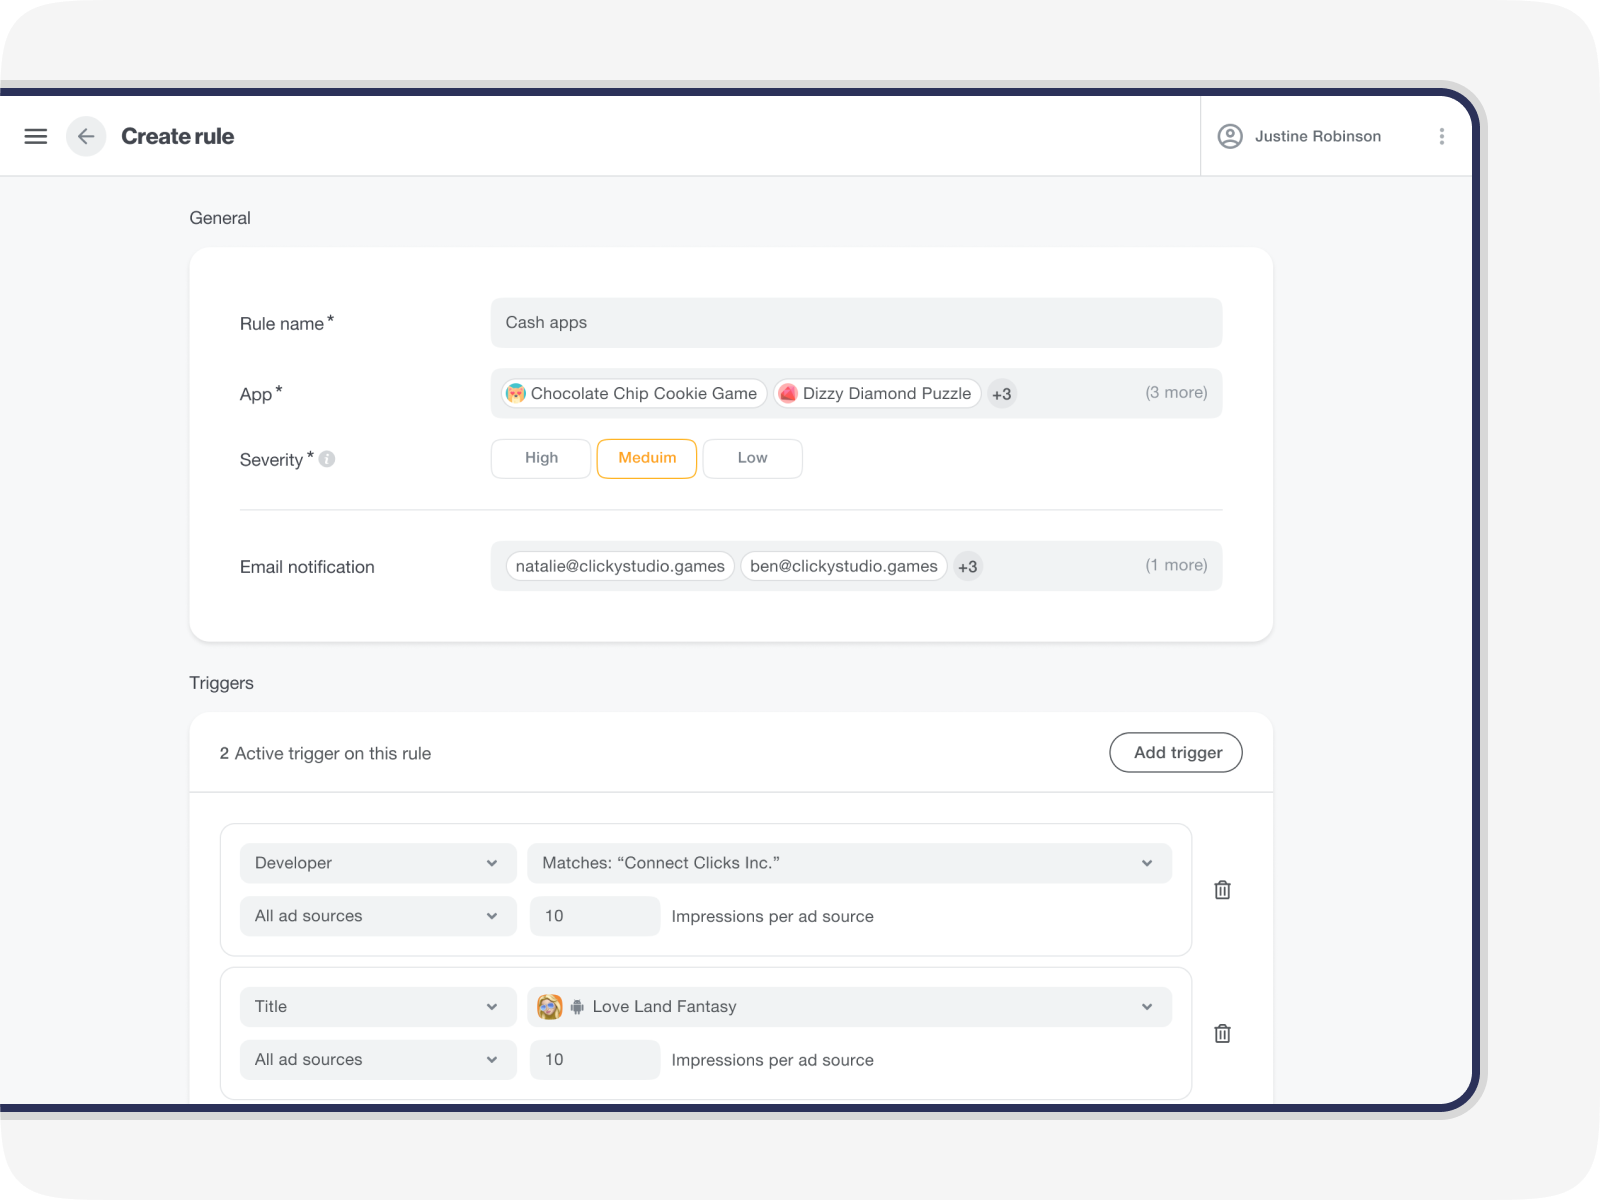
To create a rule, navigate to Rules in the LevelPlay left-side nav bar and click on Create rule in the top right-hand corner of the page.
Then, click Create rule in the top right corner of the Manage rules page.
In the General section:
- Input what you want to call the rule
- Select which apps the rule will apply to. By default, all apps are selected
- Select the the countries you want the rule to apply to. By default, all countries are selected
- Choose the severity of the rule. By default medium is selected by default (mandatory)
- Add the email addresses that will be notified once an ad has violated your rul
Then go to the Notifications section:
- Choose if you want to be notified on the advertiser level or on the creative level. If you choose Advertiser, you will receive an email with all the advertisers that violated the rule, or you can choose to get a list of all the creatives that violated the rules.
- Input the email address that you want to receive the violated rule notification
- Select the the fields that you want included in the email. The options include:
- Title
- Developer
- Android package name/iOS App Store ID (CSV upload available)
- Bad UX patterns
- Ad Quality creative ID
- Ad source creative ID
- Ad source campaign ID
- Platform
- Ad Source
- DSP
- Ad unit
- Impressions
- Last seen
- Notification trigger
Note: Only one column is needed with the ndroid package names /iOS App Store IDs when uploading in bulk via CSV
Then, continue to the Trigger section and click Add trigger. The list of available trigger types will be based on whether you selected Advertiser or Creative in the Notifications section (above).
If you selected Advertiser you will see the f the following triggers types:
- Title
- Developer
- Android package name
- iOS App Store ID
- Website
- US content rating (App Store)
- US content rating (Google Play)
- UX patterns
- Ad Quality Creative ID
If you selected Creatives as your notification level, then you will the following trigger types are available:
- UX patterns
- Ad Quality Creative ID
Then, choose the networks that you want this trigger to apply to and set the impression threshold. By default, all networks are selected, and the impressions threshold per network is set at 10.
You can add more triggers for the same rule by clicking on the Add Trigger button again. You can choose whether the notification should be triggered if it violates both trigger types by selecting AND, or if it violates either trigger by selecting OR.
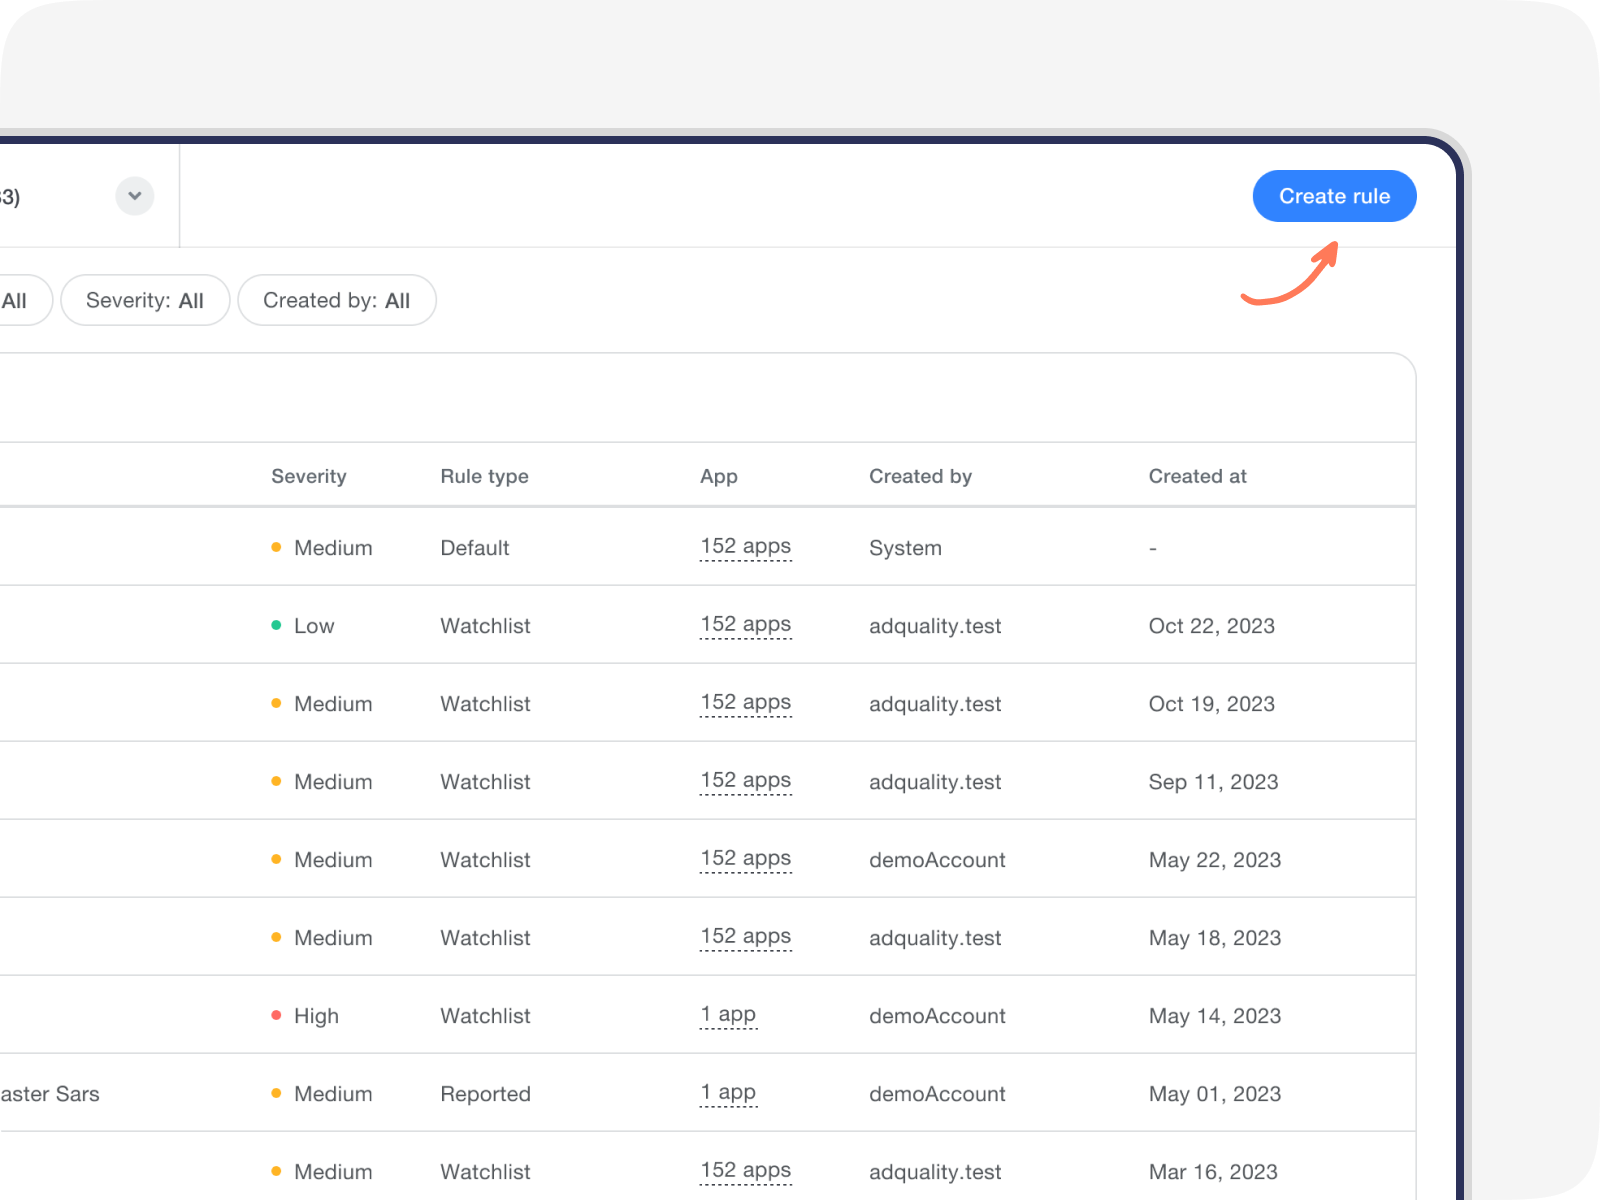
Rules
In this page you can see any of the rules on the system, go to the Manage rules page via the steps outlined above.
The table shows you who created those rules and when, and the main configuration of them.
There are 3 types of rules:
- Custom – the rules you have set according to the instruction above
- Default – rules that are pre created by the system.
- Reported – rules that were auto generated by the system when you have reported a creative on other pages on the platform.
You can edit or disable any of the rules but delete only the watchlist rules.
By default you will see only the active rules and you can use the filters on the top to change the selection.
Notifications
On the Notifications page, you’ll see a graph that enables you to visualize rule violation trends according to the metric and breakdown you choose.
The following metrics are available:
- Notifications
- Impressions
You can break the data by:
- Rule name (default)
- Advertiser
- Developer
- App
- Ad source
- Country
- Category
- Platform
- Ad unit
- Content rating
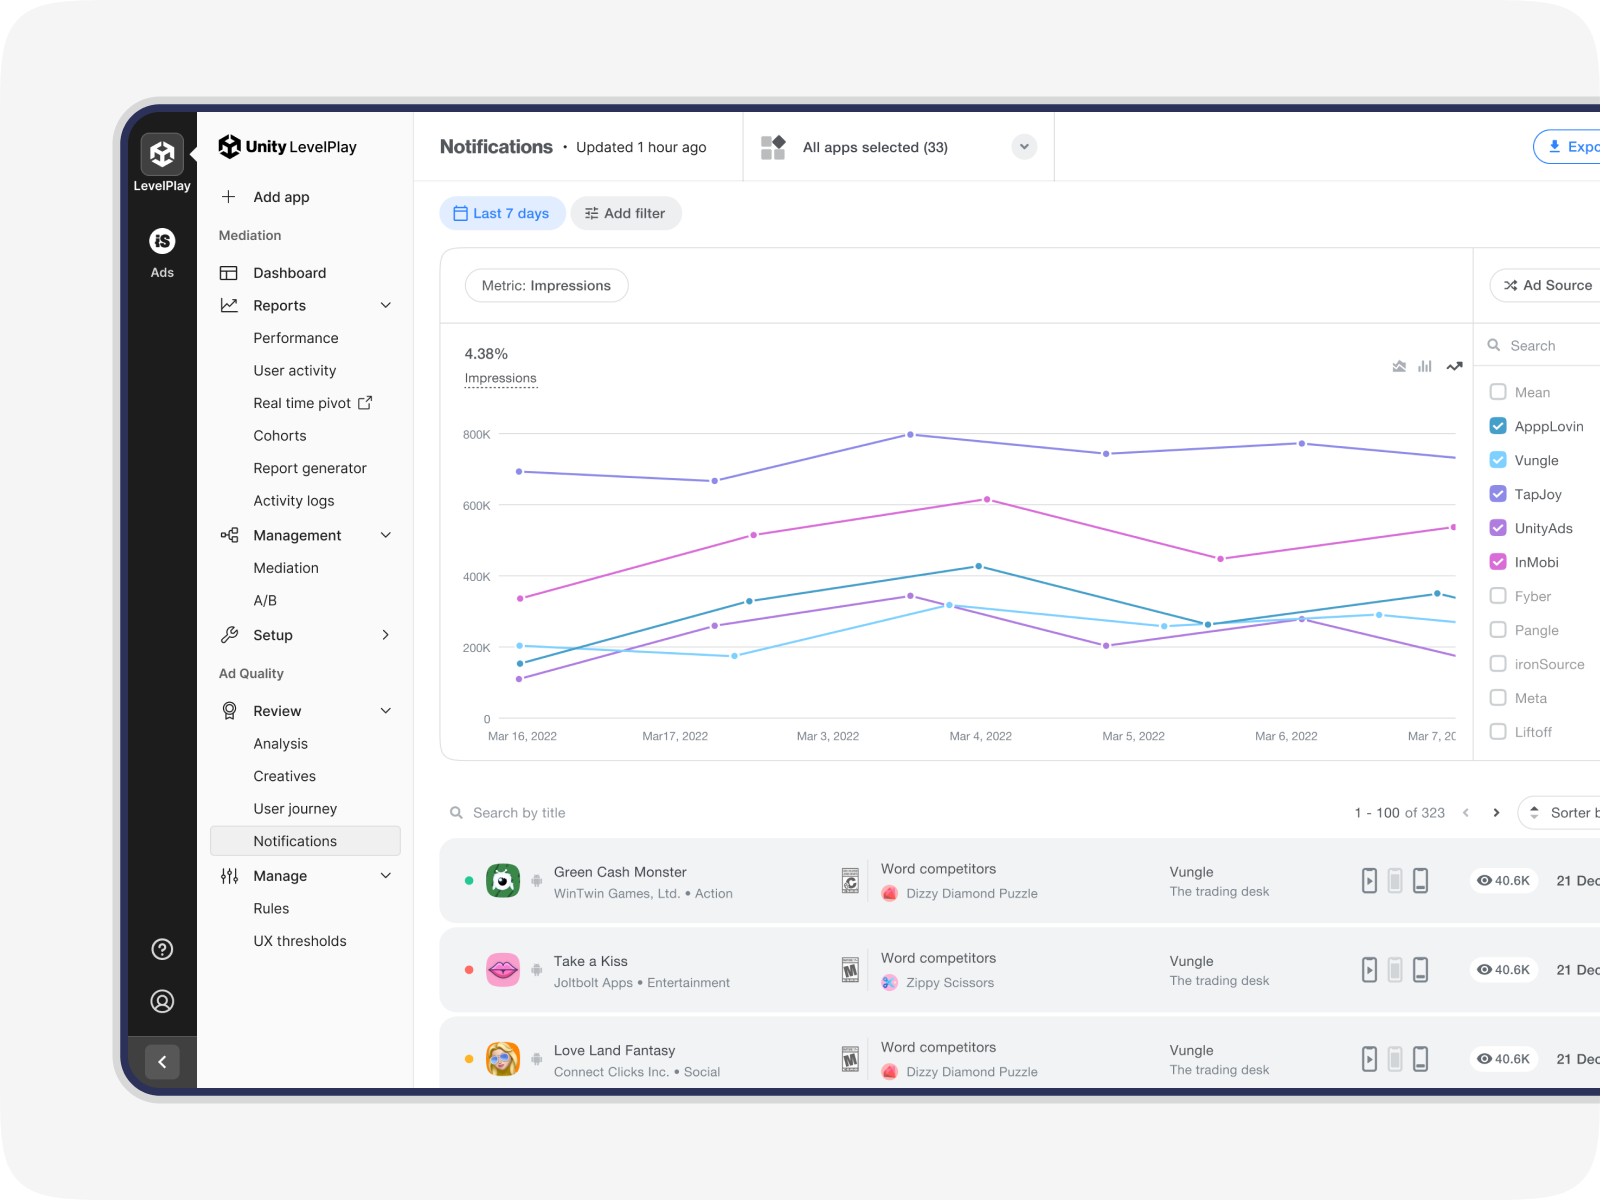
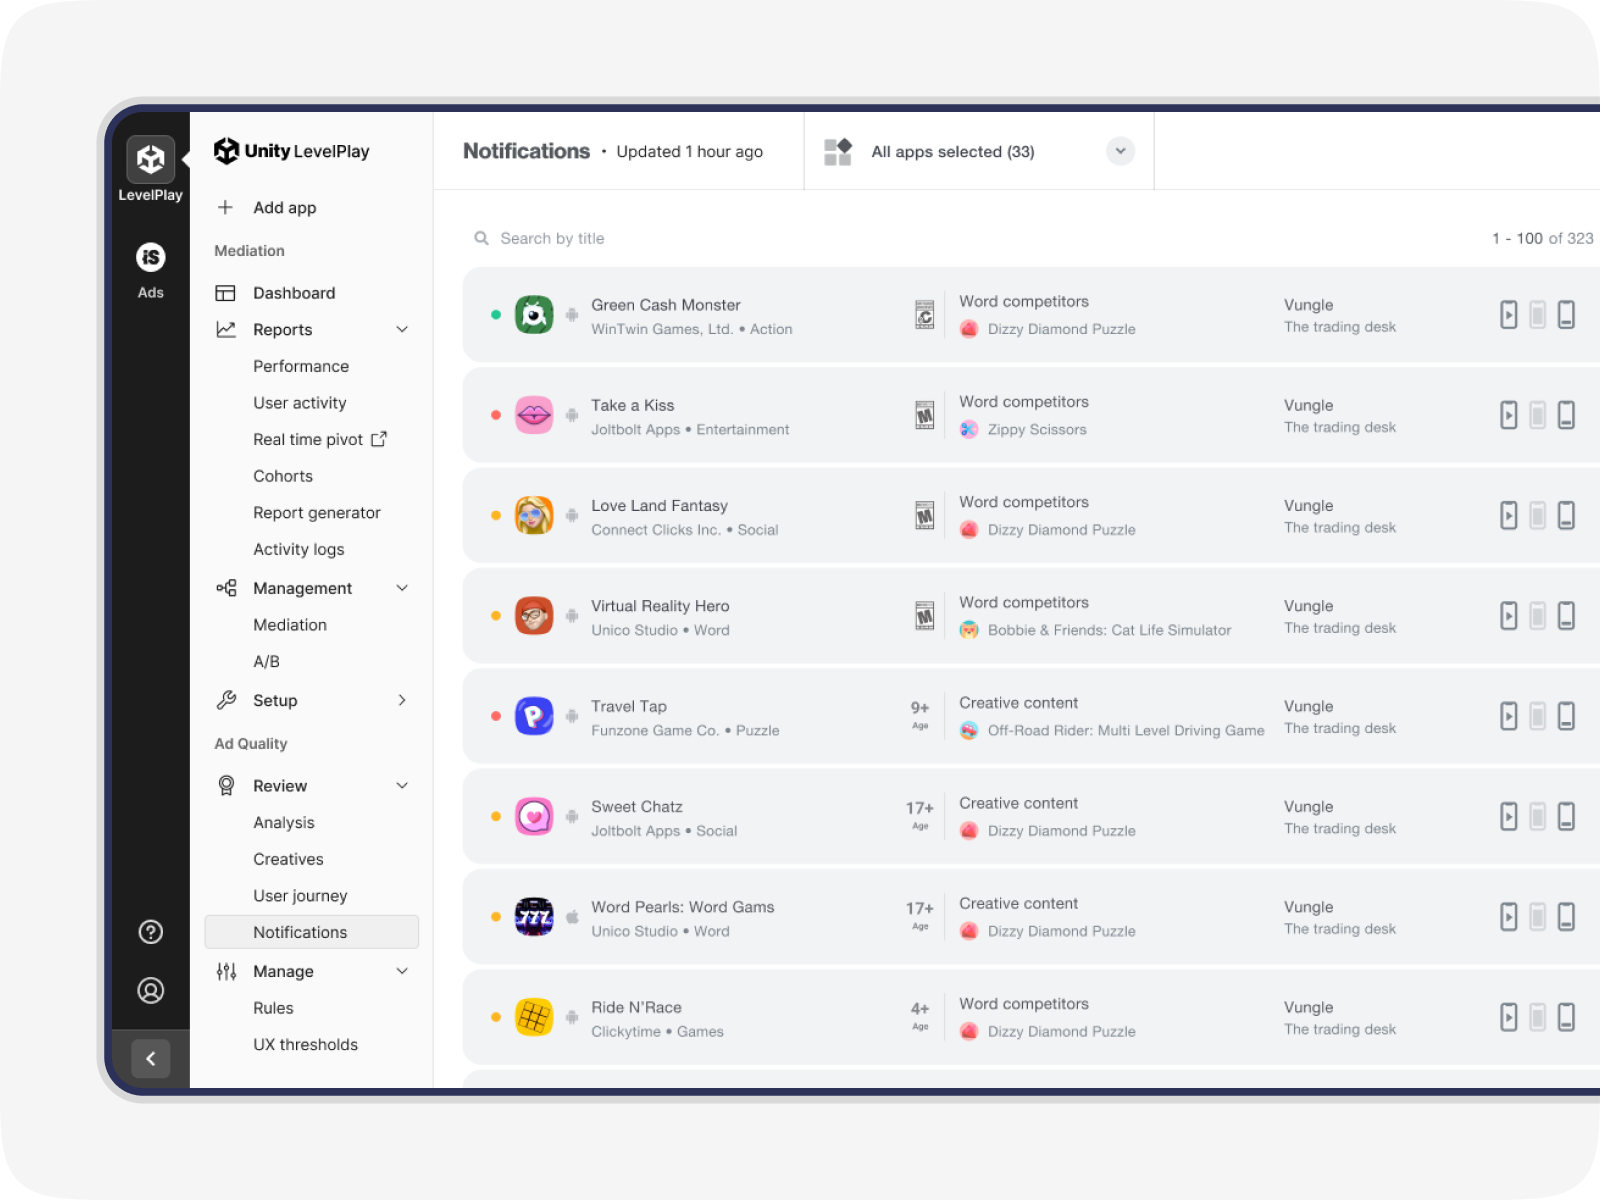
The graph is based on the data presented in the notifications table at the bottom of the page. This table lists all the creatives that have violated a rule you set.
You can filter the list:
- Rule name
- Read / Unread
- Severity
- Rule type
- Ad source
- Platform
- Title
- Category
- Impressions (indicated by the “eye” symbol)
Any filters you apply to the overview list will also apply to the graph.
To export your notifications list as a CSV, click on Export CSV at the top of the page. The file will contain all the information available on the Notifications page, according to the filters and date range you selected.
 Click on a row to get more information about the ad that violated a rule. To see all the creatives used by the advertiser, click Review all creatives.
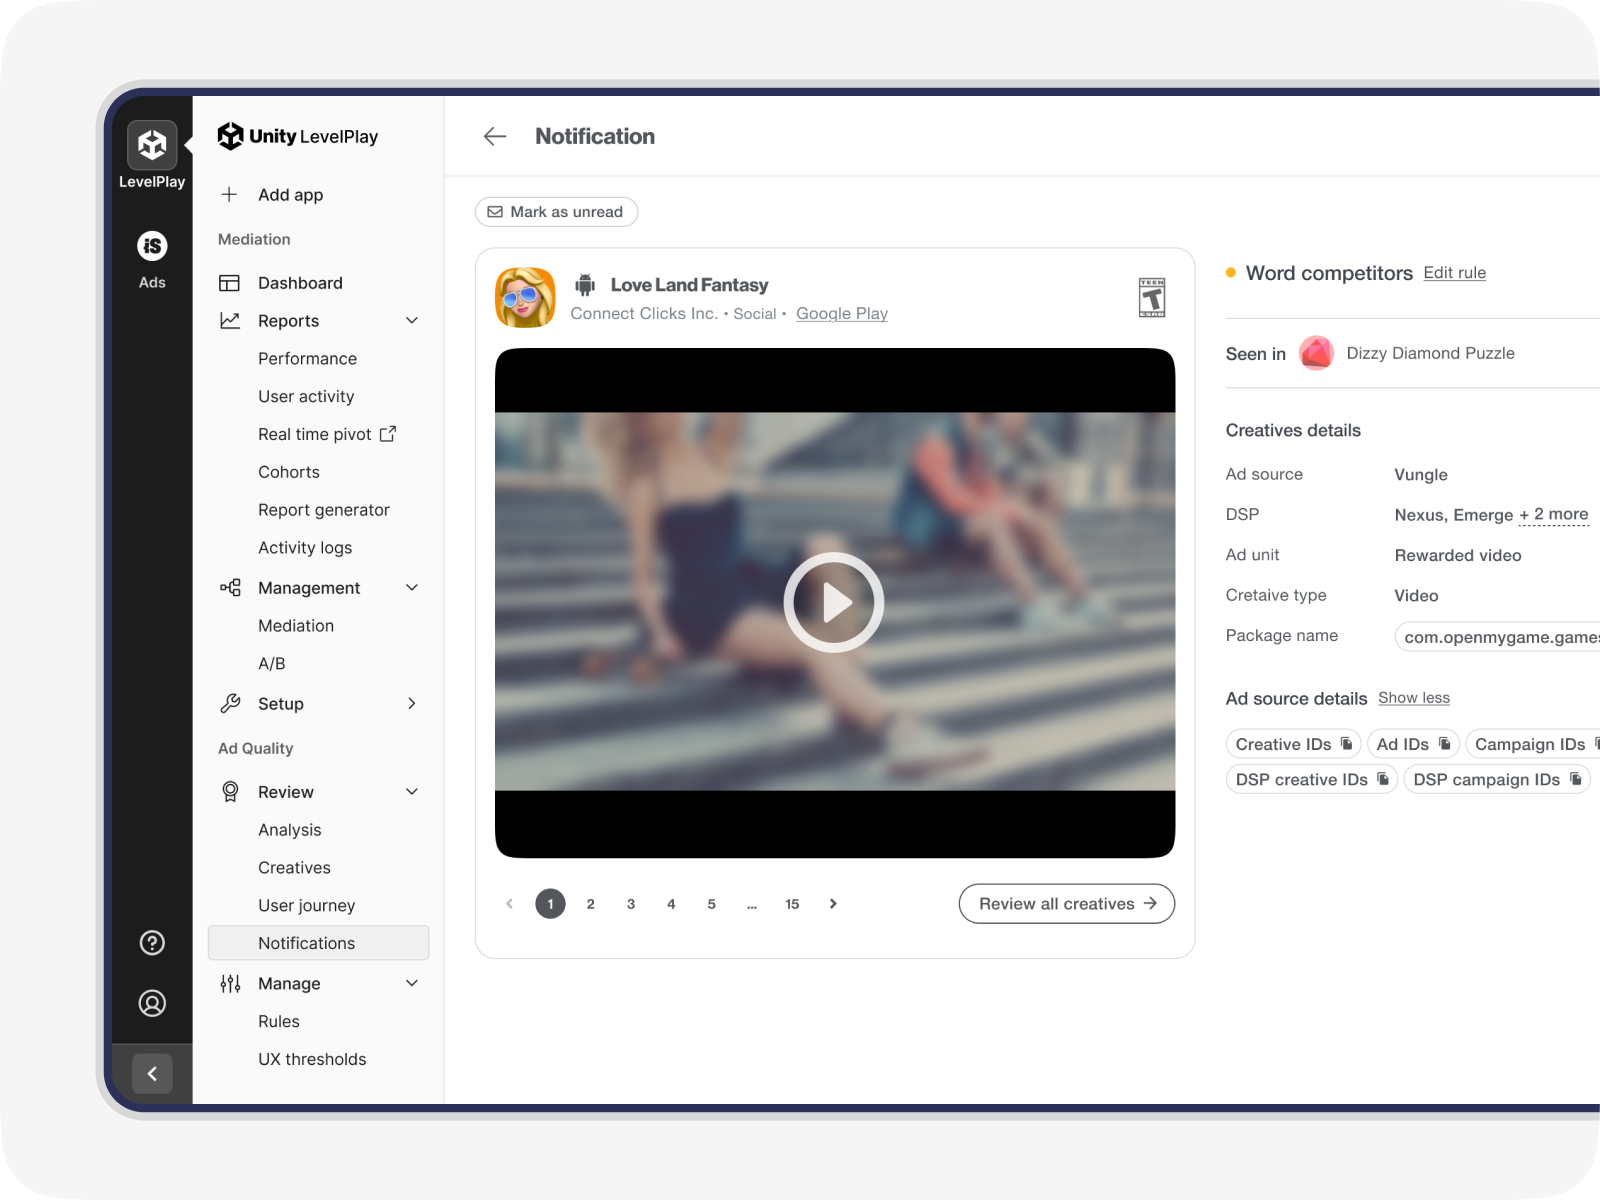 All the creatives will be displayed as a list, together with in-depth metrics. If you see a problematic creative, you can report it to the ad source directly from the platform.
Learn more about how to report a creative to an ad source here.