
Mediation SDK Networks Setup
Unity LevelPlay allows you to tap into the ad inventory of the industry’s leading ad networks. Once you’ve integrated the network adapter in your code, you’ll need to set up the networks on the platform.
Step 1. Navigate to the SDK Networks Setup page
Log in to your ironSource account and go to Monetize ➣ Mediation ➣ SDK Networks Setup:
Step 2. Configure the ad network account settings
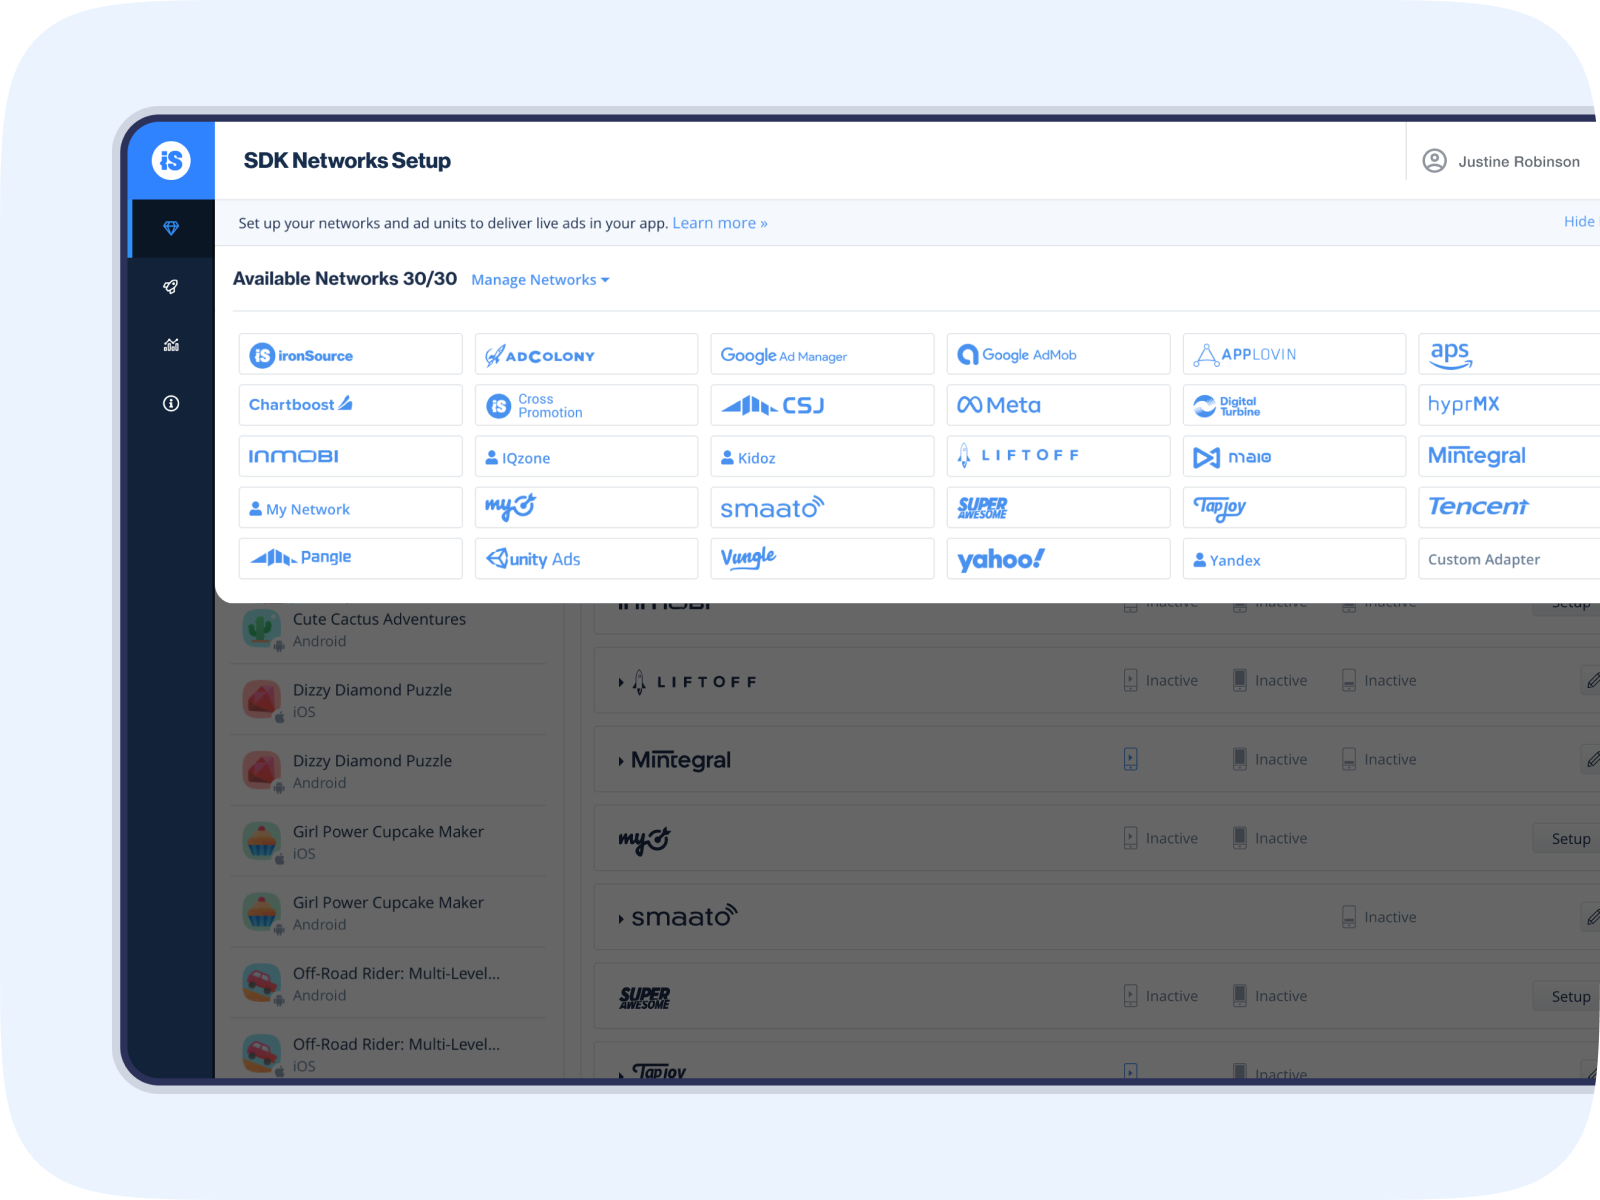
Click on Available Networks and select the ad networks you’d like to configure for Unity LevelPlay.
Enter the required account information for the selected ad network. You must have an active account with this network to serve their ad inventory in your app. This data input is required so that the ad network can recognize Unity LevelPlay and your specific settings for the ad delivery.
Every ad network has slightly different requirements. Read the Unity LevelPlay mediation guides for each ad network to learn how to find the specific data necessary for every ad network.
Configured ad networks will appear in blue.
Step 3. Select the app intended for mediation
On the left-hand side of the Setup page you will see the list of the apps that you added to your ironSource account. Select the relevant app
Step 4. Set up the ad network
If you entered the data correctly in step 2, you will see the ad network in the Setup section.
- Select Setup for the ad network
- Enter the information for the app and the unique identifier for the ad unit you want to serve
- Then click Save.
Step 5. Set up additional instances (optional)
You can leverage additional ad delivery instances of Meta Audience Network, Tapjoy, UnityAds, Vungle and AppLovin. LevelPlay supports multiple network instances for rewarded videos and interstitials.
To set up additional instances for the ironSource network, go to the Ad Units & Placements page.
Multiple placements in the waterfall for these ad networks help optimize ad revenue. You can choose to position one instance in the Manual section with an exclusive deal with the ad network, while also serving another instance of this ad network in the Auto Optimization section; thus expanding your revenue opportunities from a single network.
Add Network Instances
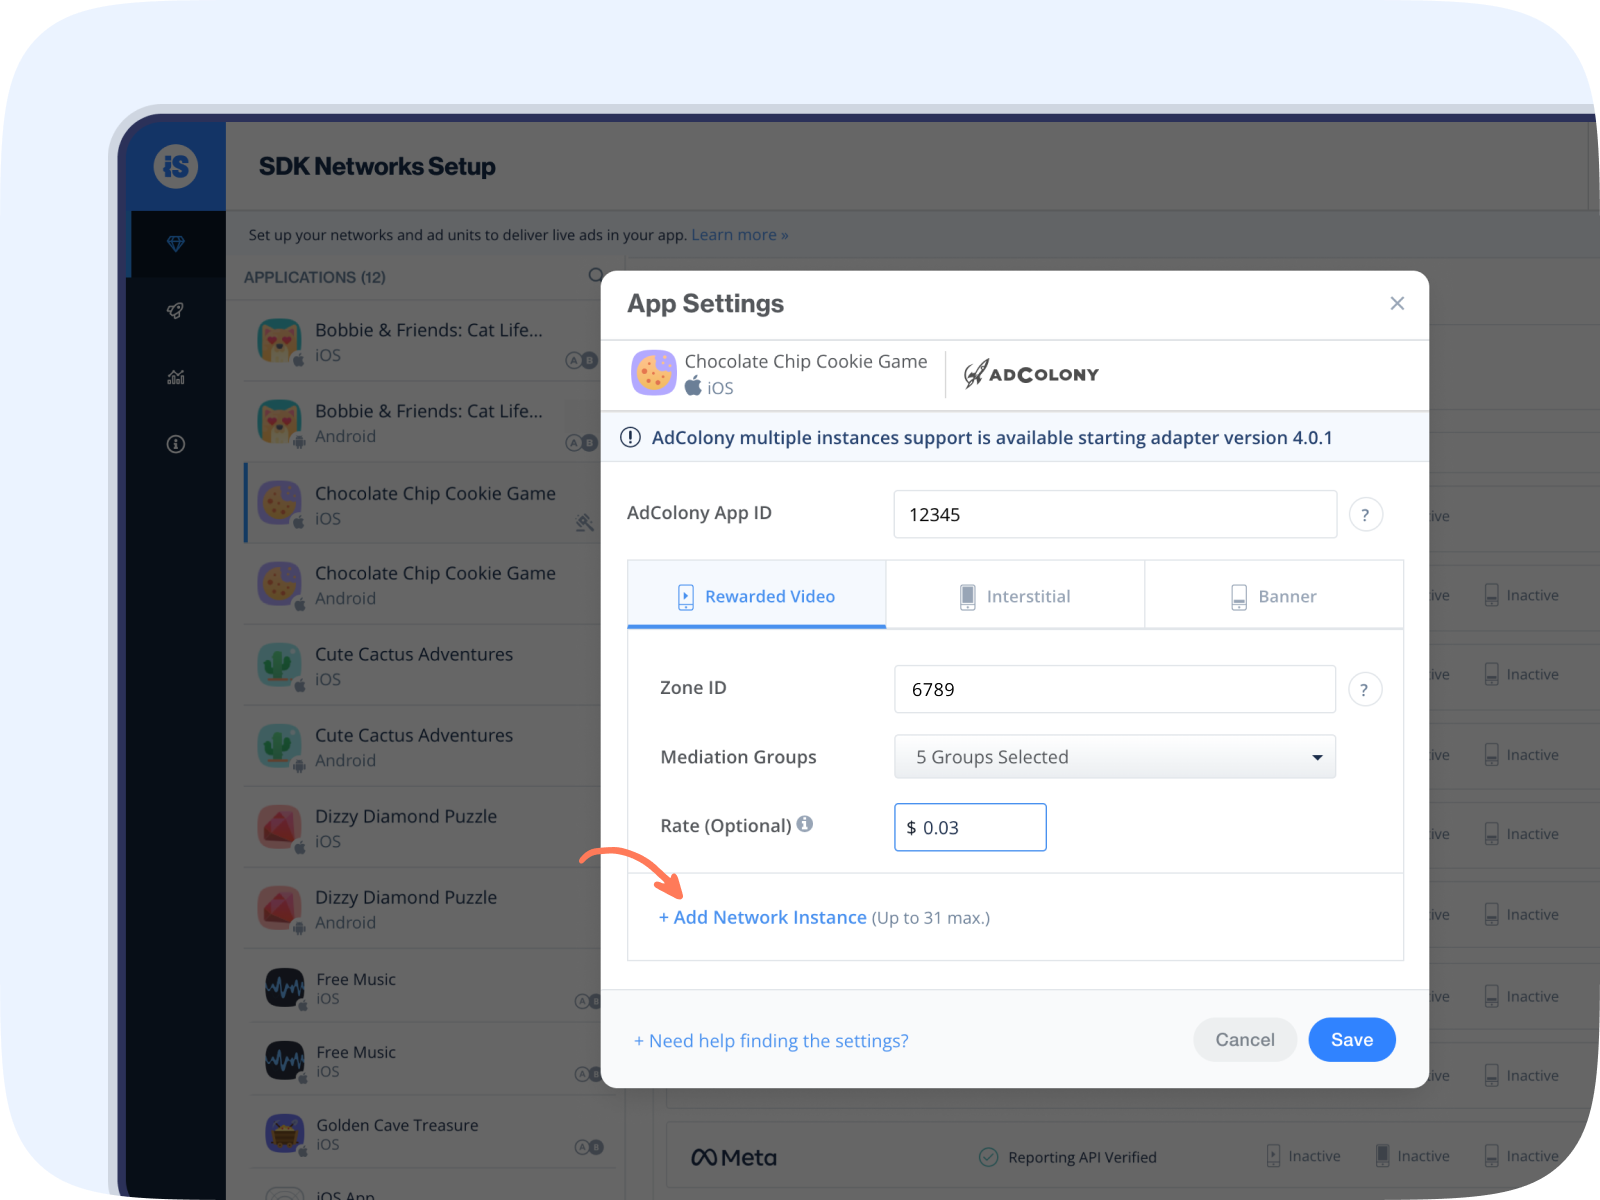
To set up an additional instance for the above mentioned ad networks, simply go to the ad network in the Setup table and click on the Edit icon to open the App Settings window:

You’ll see the Default Instance you set up in the earlier step. To add an additional instance for this network click on + Add Network Instance:
To add a network instance:
- Enter a unique name for the instance
- Set up a unique placement for the instance in the ad network’s dashboard. Make sure to complete all the relevant fields for each instance. The value you enter must be unique for the instance.
- To add multiple instances of the ironSource network, you’ll simply be required to enter a unique name for the instance.
- Click Save.
Step 6. Activate ad delivery
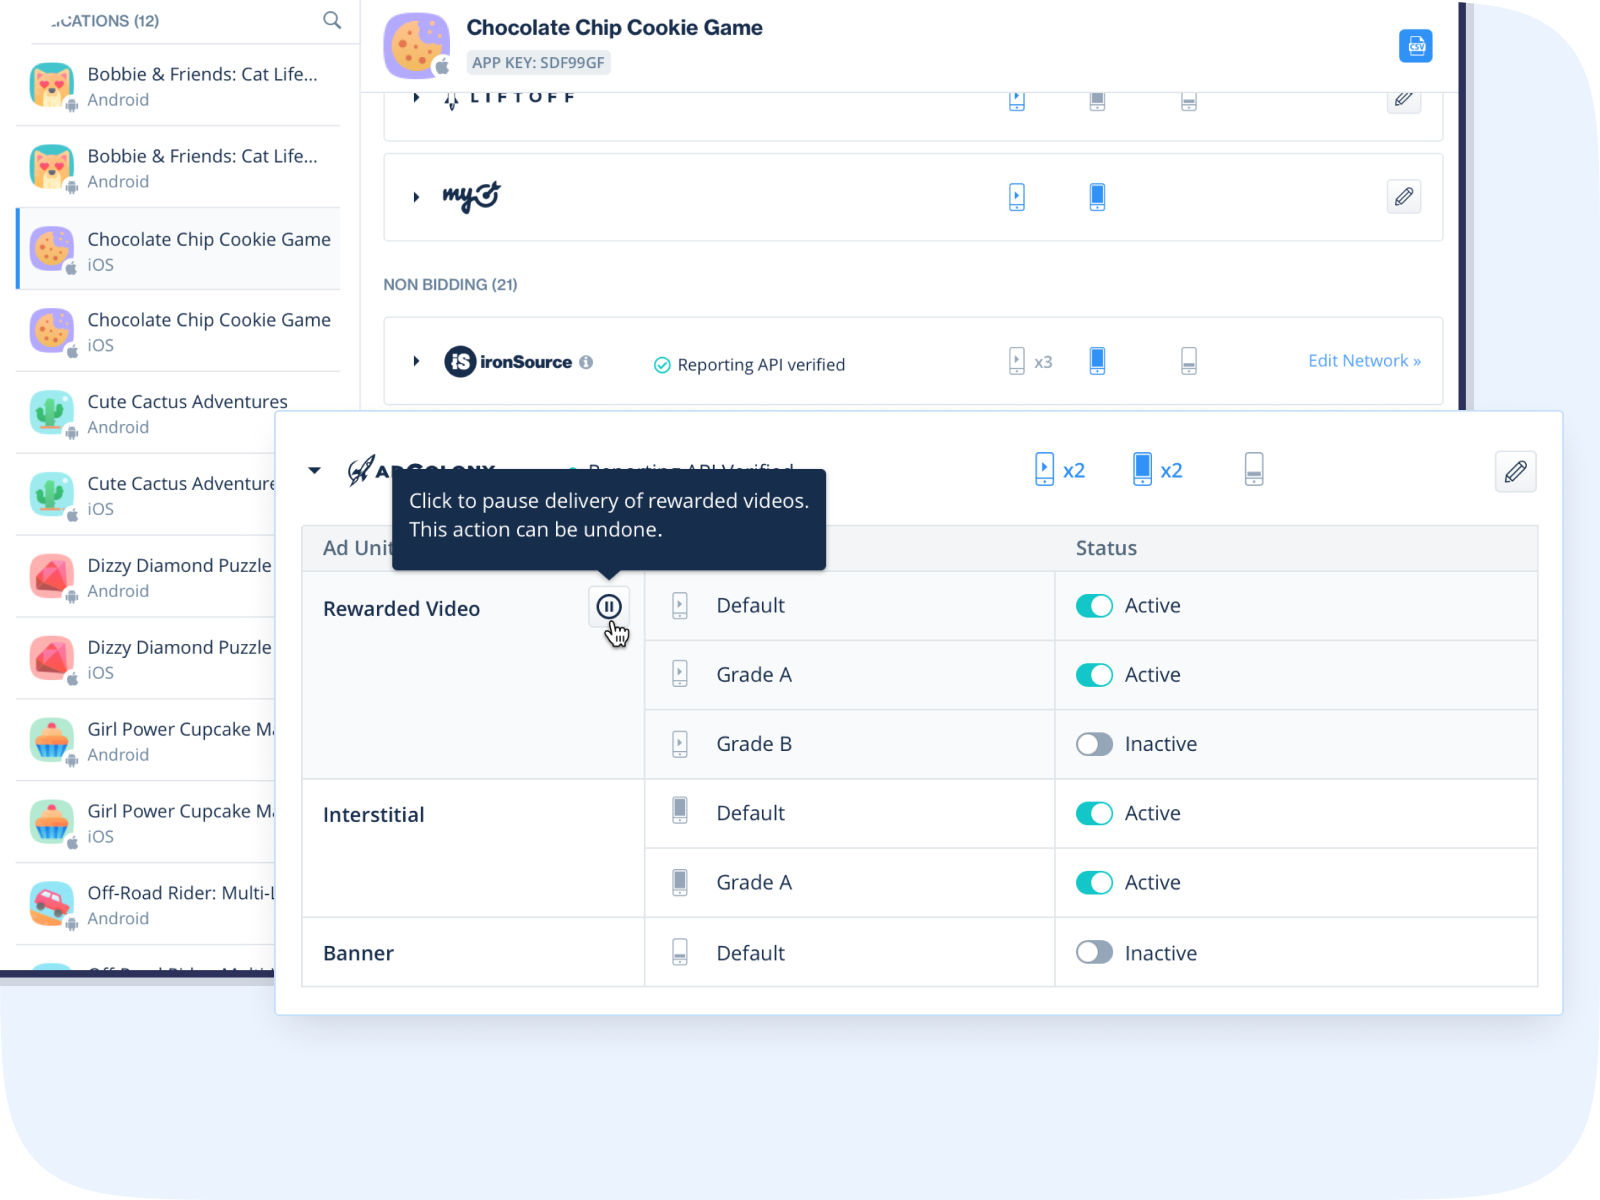
Activate the ad delivery per ad unit for each ad network by setting the toggle to Active. If you’re working with multiple instances, you can activate ad delivery by instance.

Apps that are not defined yet will appear grey. Once you’ve defined your app, you will see it clearly in the Applications list.
Pause ad delivery for an ad unit
You can temporarily stop showing ads on a specific ad unit (per network) by hovering over the ad unit name and clicking the pause button. This pause will take immediate effect, and all your settings will be saved for when you resume ad delivery.
You can make updates to your ad strategy while an instance is paused by accessing the ad unit’s instance settings via the SDK Networks page and Mediation Management page. Any updates to the paused ad unit will take effect as soon as you resume ad delivery.
Resume ad delivery of an ad unit by hovering over the paused ad unit and clicking the play button.
Step 7. Verify your integration
Reporting API Verification
To ensure transparency and seamless integration success with Unity LevelPlay mediation partners, we’ve added a Reporting API verification column in the Setup section. Once you’ve entered all the required credentials, and completed steps 1-6 above, you can verify that the selected ad network has been correctly set up in the Reporting API. You’ll receive one of three possible responses: Verified, Failed and No Response.
Done!
You’ve set up your selected ad networks on your ironSource dashboard.
Check out the best practices to most effectively manage your waterfall.